By: W14-B2 Since: March 2018 Licence: MIT
- 1. Introduction
- 2. Setting Up
- 3. Design
- 4. Implementation
- 5. Documentation
- 6. Testing
- 7. Dev Ops
- Appendix A: Product Scope
- Appendix B: User Stories
- Appendix C: Use Cases
- Appendix D: Glossary
- Appendix E: Instructions for Manual Testing
- E.1. Launch and Shutdown
- E.2. Admin Mode Logging in / Logging out
- E.3. Editing Outlet Information
- E.4. Changing Password
- E.5. Resetting Password
- E.6. Adding a Shift
- E.7. Deleting a Shift
- E.8. Applying an Employee for a Shift
- E.9. Unapplying an Employee from a Shift
- E.10. Displaying an Employee’s Shift on the Timetable
- E.11. Viewing All Employees in a Shift
- E.12. Encrypting and Decrypting Local Storage Files
- E.13. Saving and Recovering Data
1. Introduction
Part-time Manager (PTMan) is a Java application that helps employers manage and schedule their part-time employees.
It provides a graphical user interface for displaying schedules and employee information while making use of a command-line interface as the primary mode of input.
2. Setting Up
2.1. Prerequisites
You need to make sure the following prerequisites are installed on your computer before proceeding:
-
JDK
1.8.0_60or laterHaving any Java 8 version is not enough.
This app will not work with earlier versions of Java 8. -
IntelliJ IDE
IntelliJ by default has Gradle and JavaFx plugins installed.
Do not disable them. If you have disabled them, go toFile>Settings>Pluginsto re-enable them.
2.2. Setting Up the Project in Your Computer
Follow these steps to set up the project in your computer:
-
Fork this repo, and clone the fork to your computer.
-
Open IntelliJ (if you are not in the welcome screen, click
File>Close Projectto close the existing project dialog first). -
Set up the correct JDK version for Gradle.
-
Click
Configure>Project Defaults>Project Structure. -
Click
New…and find the directory of the JDK.
-
-
Click
Import Project. -
Locate the
build.gradlefile and select it. ClickOK. -
Click
Open as Project. -
Click
OKto accept the default settings. -
Open a console and run the command
gradlew processResources(Mac/Linux:./gradlew processResources). It should finish with theBUILD SUCCESSFULmessage.
This will generate all resources required by the application and tests.
2.3. Verifying the Setup
You may check that you have setup the project correctly by following these steps:
-
Run the
seedu.ptman.MainAppand try a few commands -
Run the tests to ensure they all pass.
2.4. Configurations to do Before Writing Code
2.4.1. Configuring the coding style
This project follows oss-generic coding standards. IntelliJ’s default style is mostly compliant with ours but it uses a different import order from ours. To rectify:
-
Go to
File>Settings…(Windows/Linux), orIntelliJ IDEA>Preferences…(macOS) -
Select
Editor>Code Style>Java -
Click on the
Importstab to set the order:-
For
Class count to use import with '*'andNames count to use static import with '*': Set to999to prevent IntelliJ from contracting the import statements. -
For
Import Layout: Set the order to beimport static all other imports,import java.*,import javax.*,import org.*,import com.*,import all other imports. Add a<blank line>between eachimport.
-
Optionally, you can follow the UsingCheckstyle.adoc document to configure Intellij to check style-compliance as you write code.
2.4.2. Updating documentation to match your fork
After forking the repo, links in the documentation will still point to the CS2103JAN2018-W14-B2/main repo. If you plan to develop this as a separate product (i.e. instead of contributing to the CS2103JAN2018-W14-B2/main) , you should replace the URL in the variable repoURL in DeveloperGuide.adoc and UserGuide.adoc with the URL of your fork.
2.4.3. Setting up CI
Set up Travis to perform Continuous Integration (CI) for your fork. See UsingTravis.adoc to learn how to set it up.
After setting up Travis, you can optionally set up coverage reporting for your team fork (see UsingCoveralls.adoc).
| Coverage reporting could be useful for a team repository that hosts the final version but it is not that useful for your personal fork. |
Optionally, you can set up AppVeyor as a second CI (see UsingAppVeyor.adoc).
| Having both Travis and AppVeyor ensures your App works on both Unix-based platforms and Windows-based platforms (Travis is Unix-based and AppVeyor is Windows-based) |
2.4.4. Getting started with coding
Here are some tips before you get started with coding:
-
Get some sense of the overall design by reading Section 3.1.
-
Take a look at [GetStartedProgramming].
3. Design
This section explains the design of the app.
3.1. Architecture
Figure 1 below illustrates the high-level design of the app.
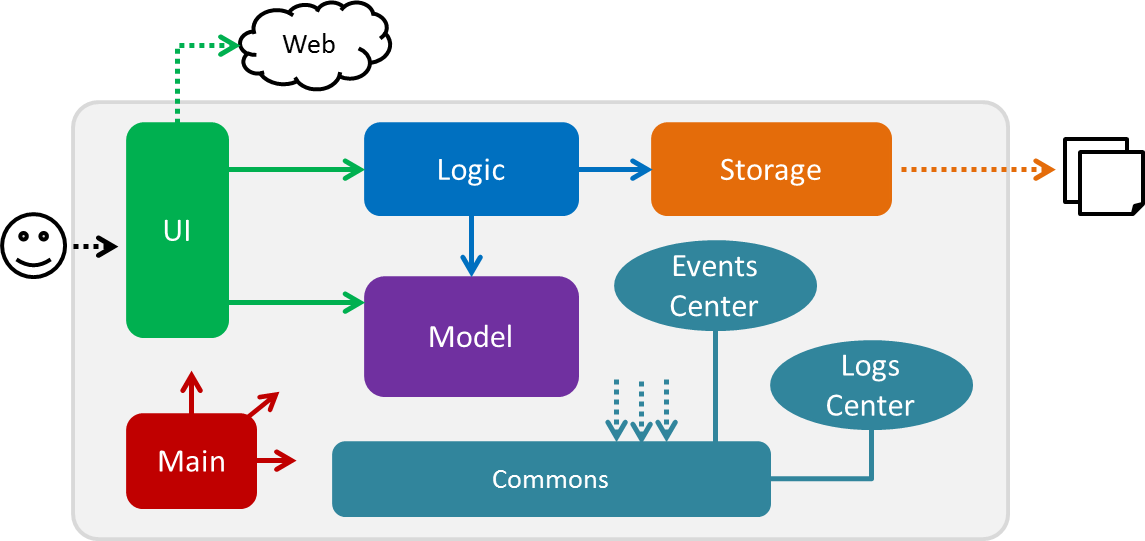
The .pptx files used to create diagrams in this document can be found in the diagrams folder. To update a diagram, modify the diagram in the pptx file, select the objects of the diagram, and choose Save as picture.
|
In this section, 'components' refer to the UI, Logic, Model, Storage, Commons, and Main as seen in Figure 1.
Here is a quick overview of each component:
-
Main: Contains a class calledMainApp, which is responsible for:-
At app launch: Initializing the components in the correct sequence and connecting them up with each other.
-
At shut down: Shutting down the components and invoking cleanup methods where necessary.
-
-
Commons: Contains a collection of classes used by other components. Two of those classes play important roles at the architectural level:-
EventsCenter: This class (written using Google’s Event Bus library) is used by components to communicate with other components using events (i.e. a form of Event Driven design). -
LogsCenter: This class is used to write log messages to the app’s log file.
-
-
UI: Displays the UI of the app. -
Logic: Executes commands. -
Model: Holds the data of the app in-memory. -
Storage: Reads data from, and writes data to, the hard disk.
The API of the UI, Logic, Model and Storage components are structured similarly. These components:
-
Define their API in an
interfacewith the same name as the component. -
Expose their functionality using a
{Component Name}Managerclass.
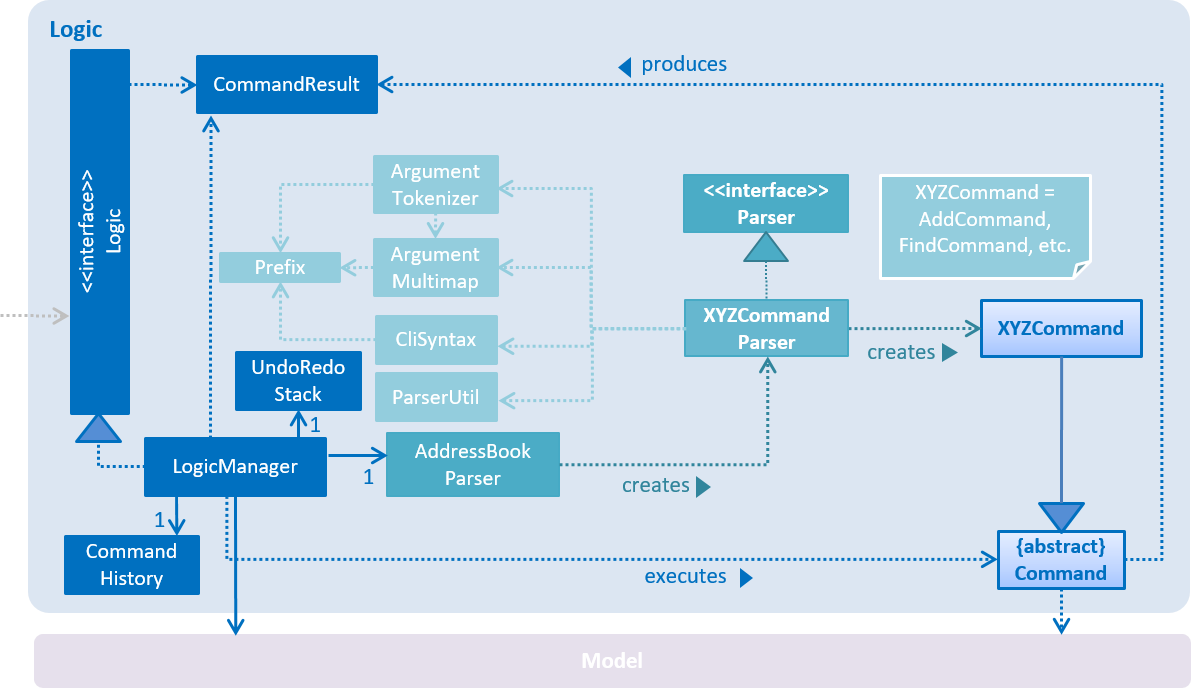
For example, the Logic component, illustrated by Figure 2, defines it’s API in the Logic.java interface and exposes its functionality using the LogicManager.java class.
Events-Driven nature of the design
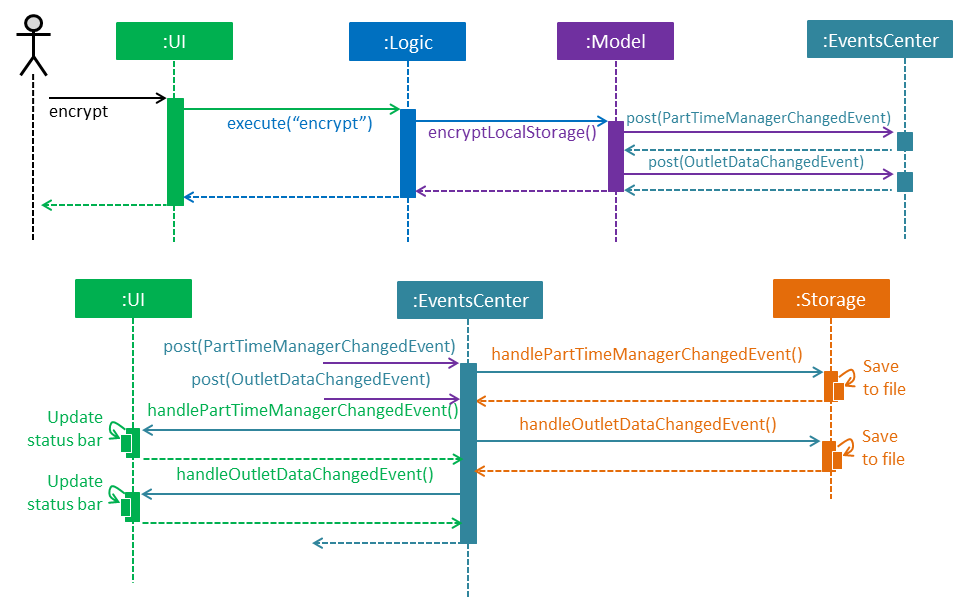
Figure 3 below shows how the components interact for the scenario where the user issues the command delete 1.
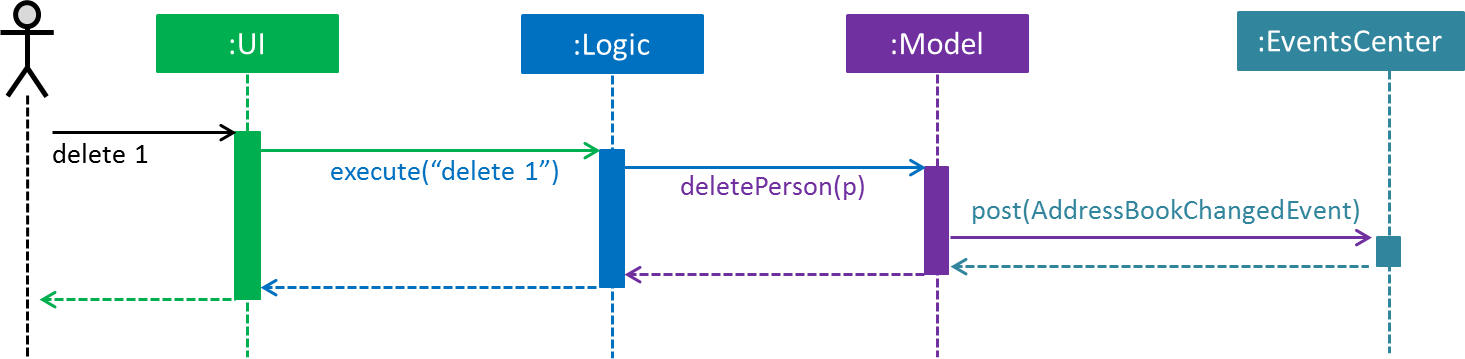
delete 1 Command (Part 1)
Note how the Model simply raises a PartTimeManagerChangedEvent when the Part-Time Manager’s data is changed, instead of asking the Storage to save the updates to the hard disk.
|
Figure 4 below shows how the EventsCenter reacts to that event, which eventually results in the updates being saved to the hard disk and the status bar of the UI being updated to reflect the 'Last Updated' time.
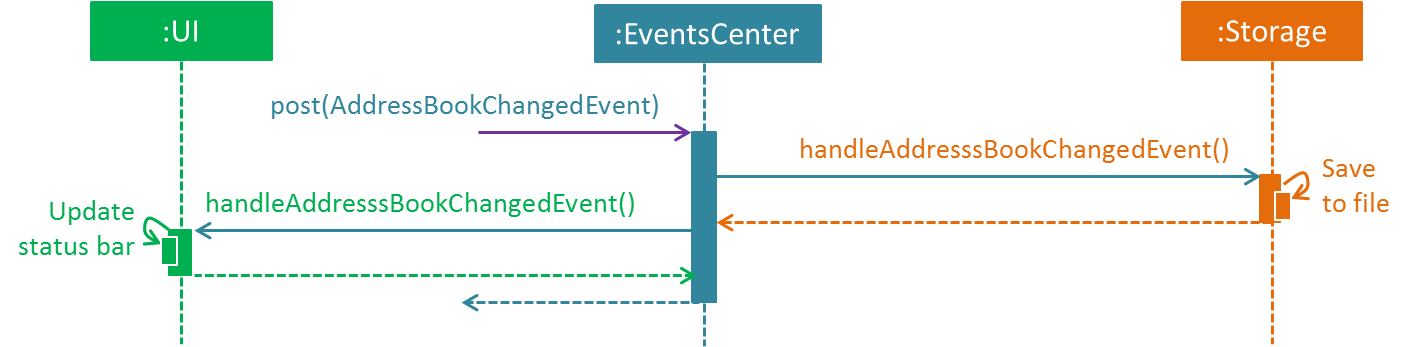
delete 1 Command (Part 2)
Note how the event is propagated through the EventsCenter to the Storage and UI without Model having to be coupled to either of them. This is an example of how this Event Driven approach helps us reduce direct coupling between components.
|
The sections below give more details of each component.
3.2. UI Component
The UI component is responsible for displaying information to the user.
Figure 5 below shows the structure of the UI component.
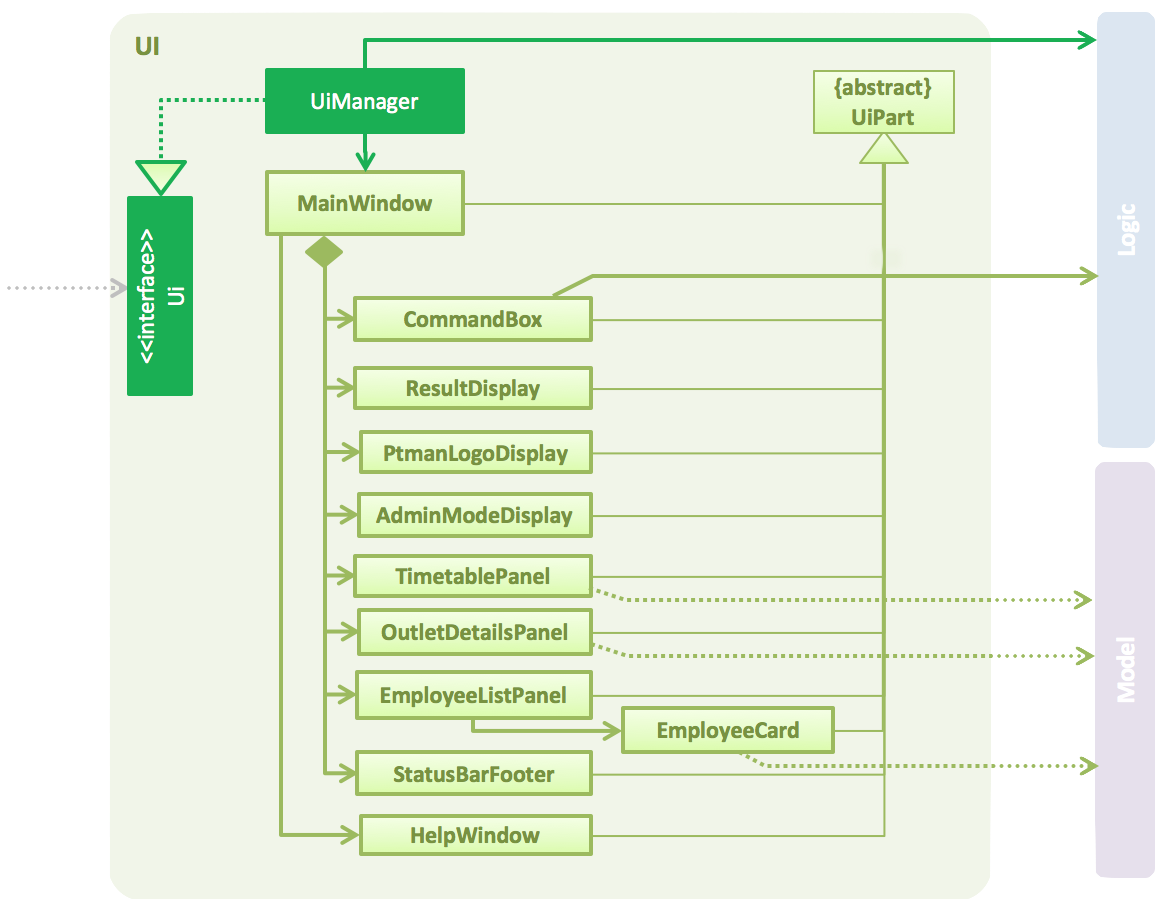
API : Ui.java
The UI consists of a MainWindow that is made up of parts e.g.CommandBox, ResultDisplay, EmployeeListPanel, StatusBarFooter, BrowserPanel etc. All these, including the MainWindow, inherit from the abstract UiPart class.
The UI component uses the JavaFx UI framework. The layout of these UI parts are defined in matching .fxml files that are in the src/main/resources/view folder. For example, the layout of the MainWindow is specified in MainWindow.fxml
The UI component:
-
Executes user commands using the
Logiccomponent. -
Binds itself to some data in the
Modelso that the UI can automatically update when data in theModelchanges. -
Responds to events raised from various parts of the app and updates the UI accordingly.
3.3. Logic Component
Figure 6 shows the overall structure of the Logic component.
API :
Logic.java
The Logic component:
-
Parses user commands using the
PartTimeManagerParserclass and returns aCommandobject. -
Executes the
Commandobject usingLogicManager. The command execution can affect theModel(e.g. adding a person) and/or raise events. -
Passes the result of the command execution (
CommandResult) to theUI.
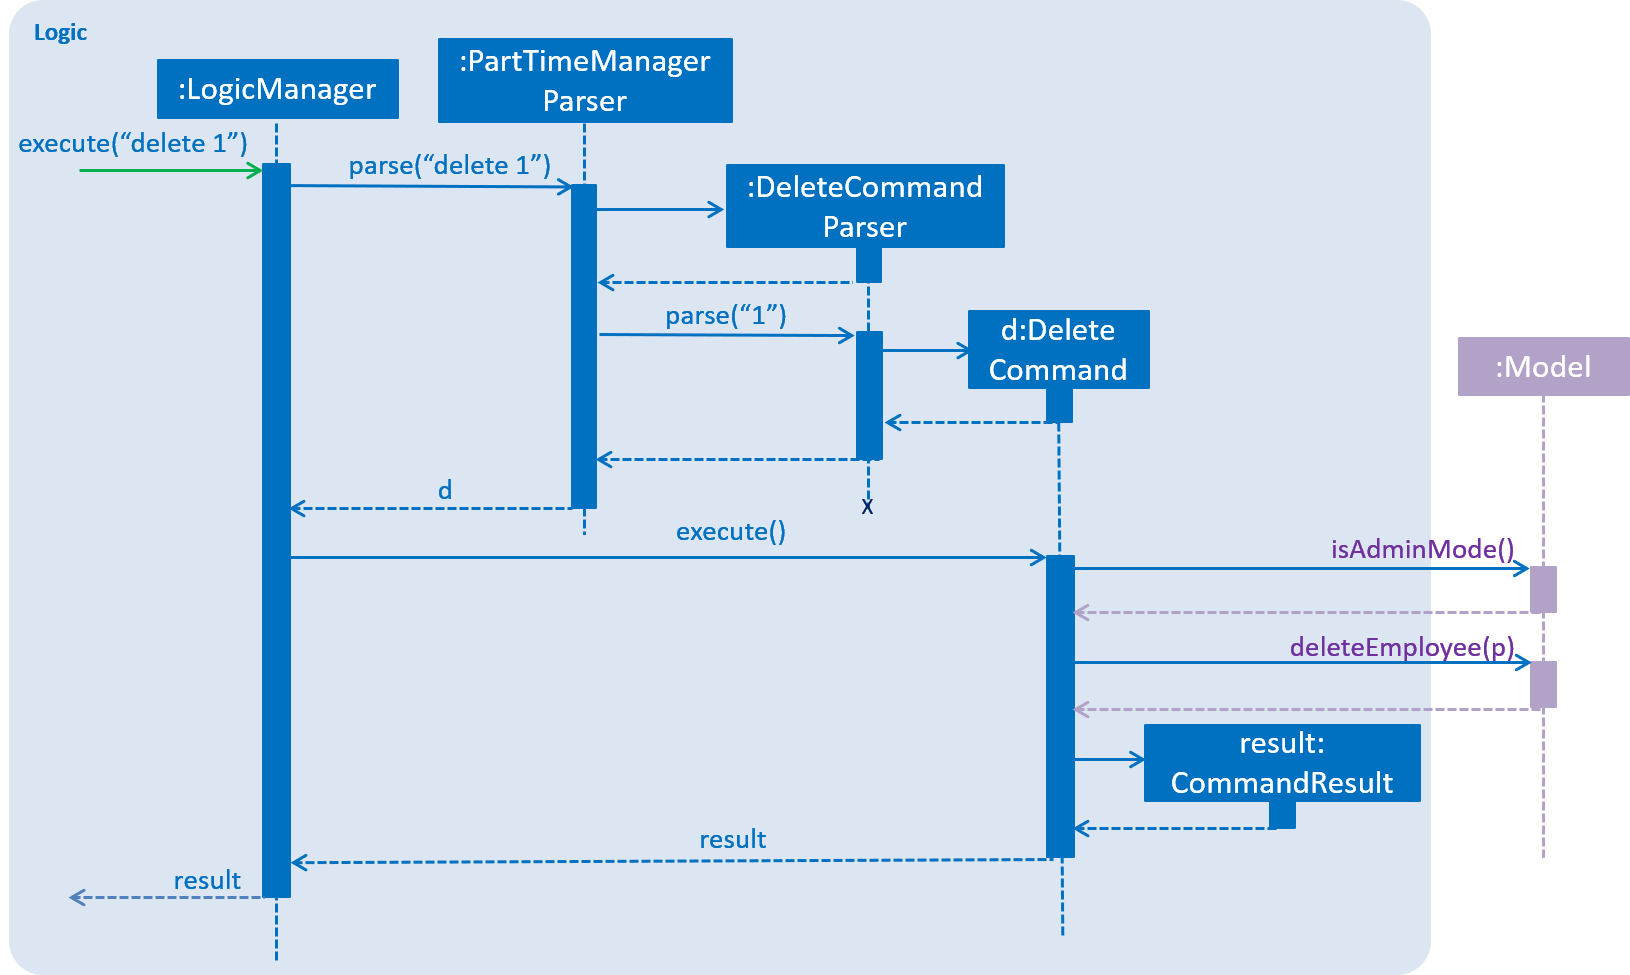
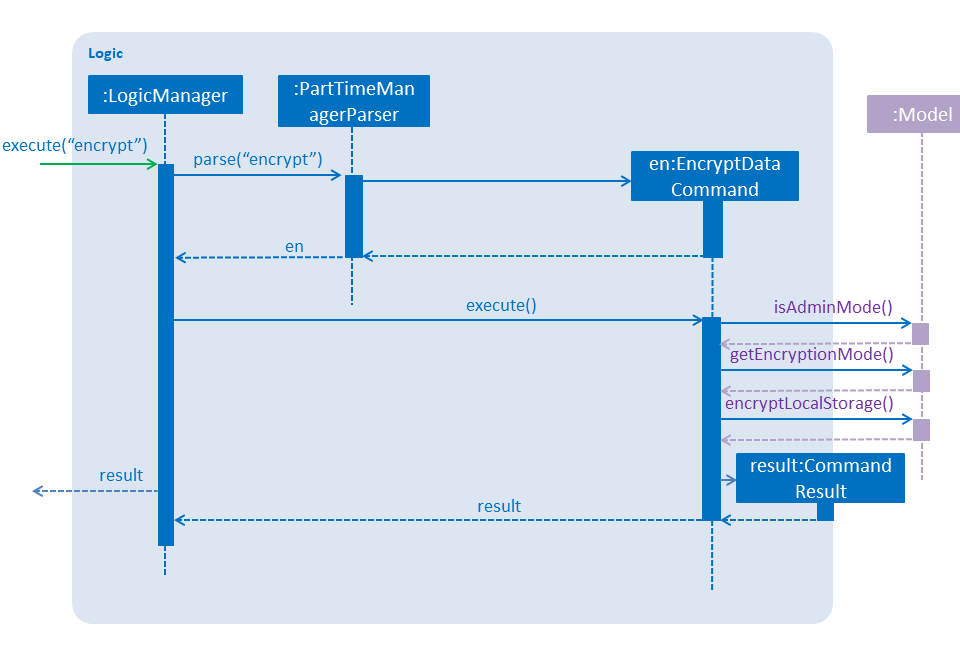
Figure 8 is the Sequence Diagram for interactions within the Logic component for the execute("delete 1") API call.
delete 1 Admin Command3.4. Model Component
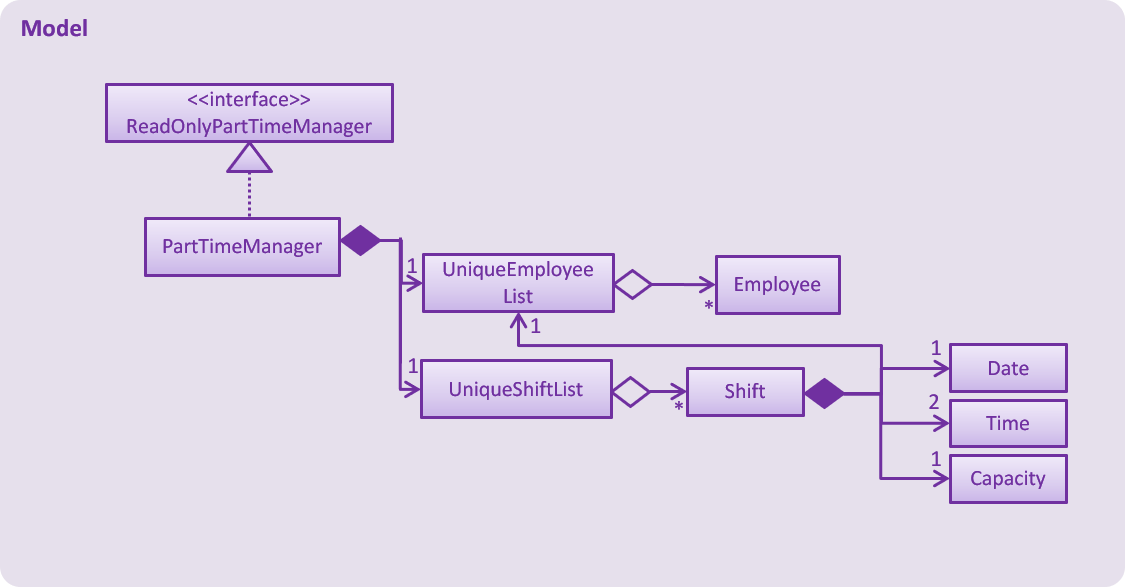
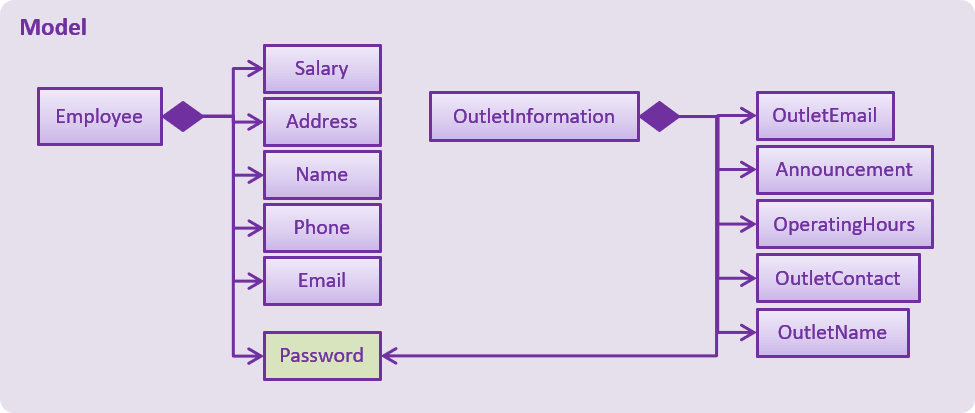
Figure 9 shows the overview of the Model component.
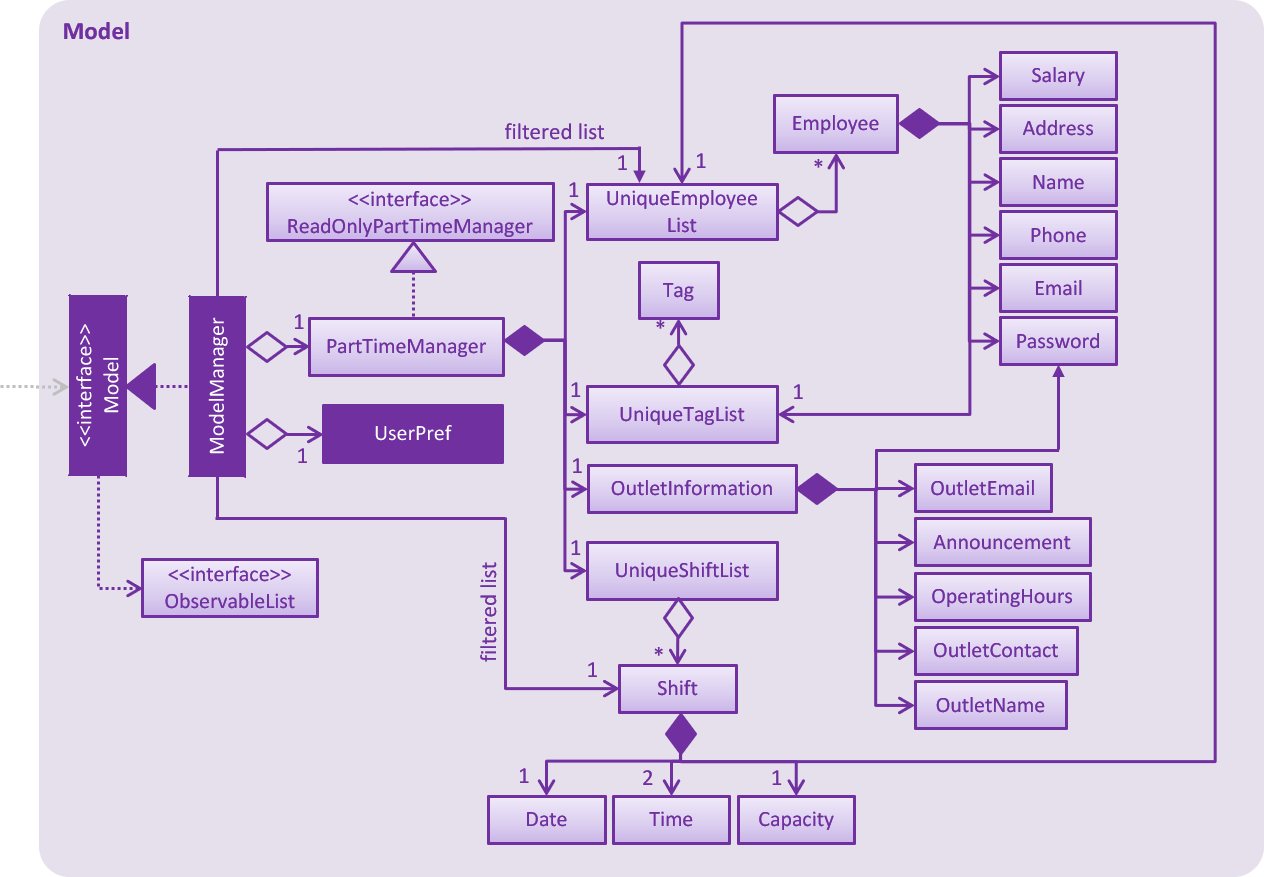
API : Model.java
The Model component:
-
Stores a
UserPrefobject that represents the user’s preferences. -
Stores the
PartTimeManagerdata in memory. -
Exposes an unmodifiable
ObservableList<Employee>andObservableList<Shift>that can be 'observed' e.g. the UI can be bound to this list so that the UI automatically updates when the data in the lists change. -
Does not depend on any of the other three components (
UI,StorageandLogic).
3.5. Storage Component
Figure 10 shows the overview of the Storage component.
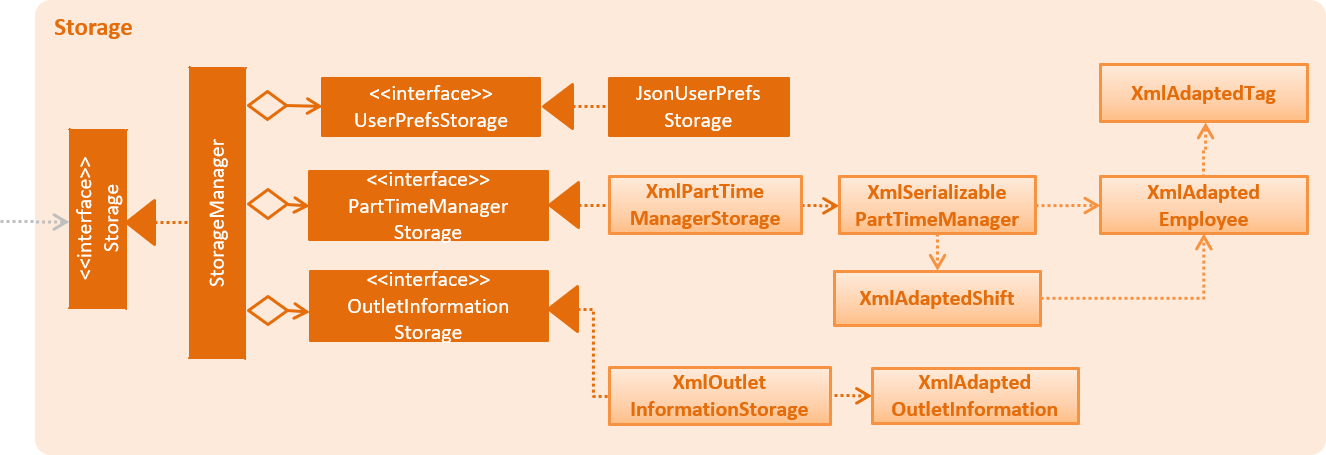
API : Storage.java
The Storage component:
-
Saves
UserPrefobjects in json format and reads it back. -
Saves the PartTimeManager data in xml format and reads it back.
3.6. Common Classes
Classes used by multiple components are in the seedu.ptman.commons package.
4. Implementation
This section describes some noteworthy details on how certain features are implemented.
4.1. Outlet Feature
4.1.1. Reason for implementation
PTMan is designed for outlets such as bubble tea shops and fast food restaurants which require a large number of part-time workers. This outlet feature stores essential outlet information such as outlet name, operating hours, contact number, email and admin password. Such details are also important to facilitate other functions such as the access control system and the timetable displayed in the app.
4.1.2. How it is implemented
4.1.2.1. OutletInformation class
The OutletInformation class represents an outlet in PTMan.
It supports commands that utilize attributes of this class. It is also responsible for information displayed in the UI and data stored in local storage files.
Figure 11 is a class diagram that displays the association between OutletInformation and other classes in the Model.
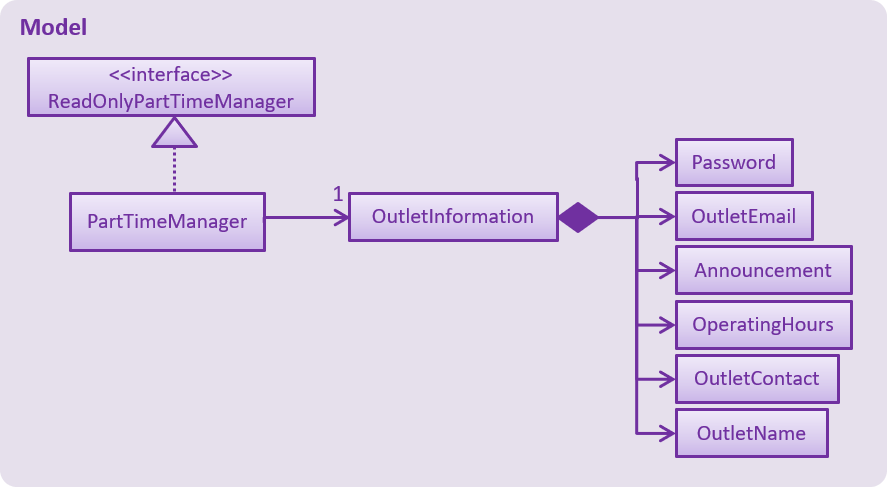
With reference to Figure 11, an OutletInformation object stores a boolean value isDataEncrypted and six other attributes, including masterPassword, outletName, operatingHours, outletEmail, outletContact and announcement.
Currently, the OutletInformation object initialized in the PartTimeManager is created by calling its default constructor:
OutletInformation outlet = new OutletInformation();This default constructor initializes a boolean value isDataEncrypted to false and six other attributes to respective default values.
This is because with the help of initial values, any employer new to PTMan does not need to create a new OutletInformation object using commands such as addoutlet.
It provides convenience for users. Outlet managers can edit those values by entering an editoutlet command after they log in.
4.1.2.2. Commands
Currently, there are two commands that allow outlet managers to change attributes of the OutletInformation: editoutlet and announcement commands which are implemented in similar ways.
The implementation of editoutlet command will be explained in details.
In addition, there are also commands that allow managers to encrypt and decrypt local storage files.
The implementation of encrypt command and how data is encrypted will be explained in details.
4.1.2.2.1. Edit outlet command
The editoutlet command can change outlet name, operating hours, contact number and email, which are displayed in the app as shown in Figure 12.
The information displayed will change after a successful command.

When an editoutlet command executes successfully, three events will be raised and handled as shown in Figure 13:
-
OutletNameChangedEventupdates the outlet name displayed in the app. -
OutletInformationChangedEventupdates the operating hours, contact number and email displayed in the app. -
OutletDataChangedEventsaves latest outlet information to the local storage file "data/outletinformation.xml".
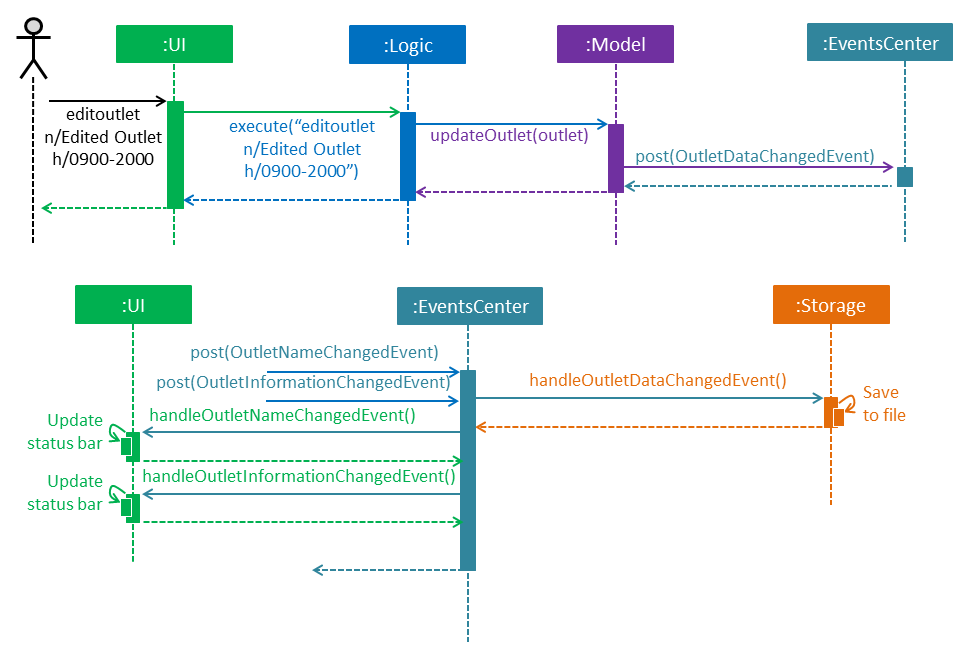
editoutlet CommandThe following sequence diagram (Figure 14) illustrates how an editoutlet command is executed in the Logic Component, and how it interacts with the Model Component.
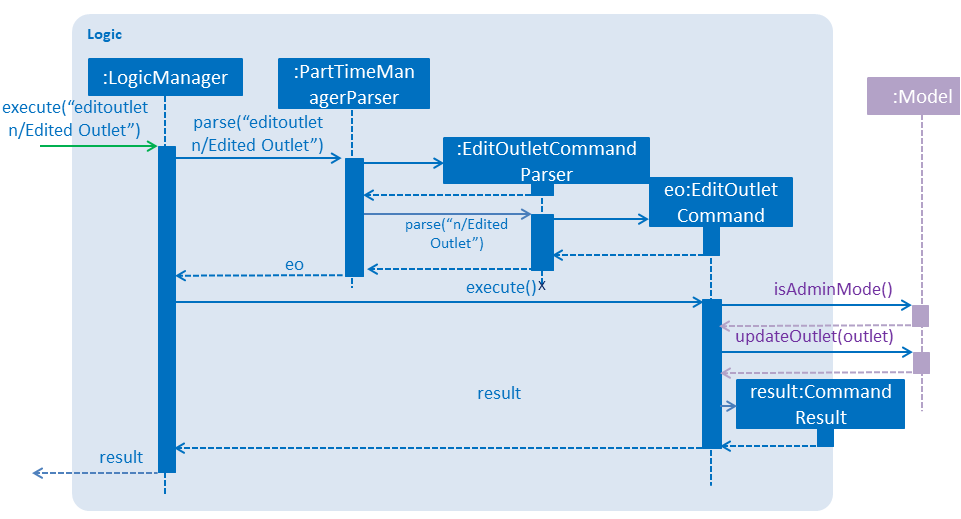
editoutlet n/Edited Outlet Admin CommandCurrently, editing outlet information with some fields unspecified is allowed.
For example, editoutlet n/OUTLETNAME is a valid command.
The reason why it is implemented in this why is that it enables employers to edit only the information required for change.
In order to check whether some fields are specified, several branches are created in the setOutletInformation method of the OutletInformation class.
When all fields are null, it throws a new exception as shown below:
if (name == null && operatingHours == null && outletContact == null && outletEmail == null) {
    throw new NoOutletInformationFieldChangeException();
}
This NoOutletInformationFieldChangeException is then handled by the EditOutletCommand.
When the exception is caught, the CommandException with a message of command failure will be thrown,
with reference to the function below:
try {
    editedOutlet.setOutletInformation(name, operatingHours, outletContact, outletEmail);
} catch (NoOutletInformationFieldChangeException e) {
    throw new CommandException(MESSAGE_EDIT_OUTLET_FAILURE);
}
4.1.2.2.2. Encrypt and decrypt commands
Since PTMan stores files locally, it is highly possible that any worker in the outlet can open the storage files and read data inside.
Such files store a large amount of essential and private data such as admin password, employees' passwords, employees' phones, addresses, and emails.
By using the encrypt command, the data in local storage files can be hidden from any group of people who do not have the access to it.
Managers can use the decrypt command to make the files human-readable.
When an encrypt command executes successfully, two events will be raised and handled with reference to Figure 15:
-
PartTimeManagerChangedEventsaves encrypted or decrypted information of employees and shifts to the local storage file "data/parttimemanager.xml". -
OutletDataChangedEventsaves encrypted or decrypted outlet information to the local storage file "data/outletinformation.xml".
encrypt CommandThe following sequence diagram (Figure 16) illustrates how an encrypt command is executed in the Logic Component, and how it interacts with the Model Component.
encrypt Admin CommandCurrently, the local data is encrypted in the Advanced Encryption Standard (AES) in XML files.
The secret key used is a byte array of "TheBestSecretKey".
The function below demonstrates how encryption is implemented using javax.crypto.Cipher:
Key key = generateKey();
Cipher c = Cipher.getInstance(ALGO);
c.init(Cipher.ENCRYPT_MODE, key);
byte[] encVal = c.doFinal(data.getBytes());
return Base64.getEncoder().encodeToString(encVal);
The encryption status is stored in OutletInformation as a variable isDataEncrypted.
The encryption status stored in local files, with reference to the third line of Figure 17, is always plaintext because it is used to convert strings in XML files to models.
In encryption mode, data writen to or read from XML files will be encrypted using encrypt(String plainText) or decrypted using decrypt(String cipherText) respectively.

4.1.3. Design considerations
4.1.3.1. Aspect: implementation of OutletInformation class
-
Alternative 1 (current choice): Use default constructor to initialize all attributes with default values.
-
Pros: Provides convenience to users because they do not have to create a new outlet by themselves.
-
Cons: Lacks flexibility to initialize the attributes with user-defined values.
-
-
Alternative 2: Use a constructor with more parameters.
-
Pros: Allows flexibility in storing outlet information.
-
Cons: Needs to be very careful when calling the constructor. Since
isDataEncryptedcan be initialized to true, users new to this app must be informed clearly that data stored in local files are encrypted. Moreover, the default admin password in the User Guide must be updated to what is initialized in themasterPassword. Otherwise, users are unable to log in with correct password when they start using the app for the first time.
-
4.1.3.2. Aspect: implementation of encryption and decryption
-
Alternative 1 (current choice): Encrypt and decrypt data writen to and read from XML files.
-
Pros: Successfully prevents any user of the computer directly interpreting the stored information in a clean and fast way.
-
Cons: Still maintains the XML file structure and does not encrypt the title of each element as shown in Figure 17. It is possible that any user with advanced knowledge of data encryption is able to decrypt the data with the found patterns.
-
-
Alternative 2: Encrypt and decrypt XML files with the XMLCipher package from apache.org with reference to the code below.
-
Pros: Enhances safety of data since there are no more obvious patterns in XML files.
-
Cons: Increases difficulty in saving and backing up data in local files because additional encrypted and decrypted files need to be created and replace original files.
-
public static Document encryptDocument(Document document, SecretKey secretKey, String algorithm) throws Exception {
    Element rootElement = document.getDocumentElement();
    XMLCipher xmlCipher = XMLCipher.getInstance(algorithm);
    xmlCipher.init(XMLCipher.ENCRYPT_MODE, secretKey);
    xmlCipher.doFinal(document, rootElement, true);
    return document;
}
4.2. Shifts Feature
4.2.1. Reason for implementation
PTMan is designed to give employees the freedom and flexibility to choose the shifts they want to work in. By allowing employers to add or delete shifts, employees can then apply for the shifts that are available.
4.2.2. How it is implemented
The Shift class represents a shift in PTMan.
It stores:
-
The
Dateof the shift.Dateis a class that wraps Java’sLocalDateclass. -
The starting and ending
Timeof the shift.Timeis a class that wraps Java’sLocalTimeclass. -
The employee
Capacityfor the shift.Capacityis a class that wraps an integer. -
The
UniqueEmployeeListof employees working in the shift.UniqueEmployeeListis a list that stores theEmployeeobjects of employees that have applied for the shift. It guarantees there are no duplicate employees in the shift.
Figure 18 is a class diagram that displays the association between Shift and other components in the Model.
Date and Time use Java’s LocalDate and LocalTime classes for easy integration with the timetable.
They also make formatting and parsing simple through the use of Java’s DateTimeFormatter.
To store a list of shifts in PartTimeManager, we use a UniqueShiftList to ensure there are no duplicate shifts.
4.2.2.1. Commands
The following are commands that directly interact with the Shift class:
-
AddShiftCommand: Creates aShiftand adds it to theUniqueShiftListinPartTimeManager. -
DeleteShiftCommand: Deletes aShiftfrom theUniqueShiftListinPartTimeManager. -
ApplyCommand: Adds anEmployeeto theUniqueEmployeeListin theShift.
To adhere to defensive programming practices, instead of simply adding theEmployeeto theShift,ApplyCommanddoes the following:-
Create a copy of the specified
Shift -
Add the
Employeeto the copy. -
Replace the original
Shiftwith the copy.
-
-
UnapplyCommand: Removes anEmployeefrom theUniqueEmployeeListin theShift.
Similar toApplyCommand,UnapplyCommandwill:-
Create a copy of the specified
Shift. -
Remove the
Employeefrom the copy. -
Replace the original with the copy.
-
4.2.2.2. Shift indexing
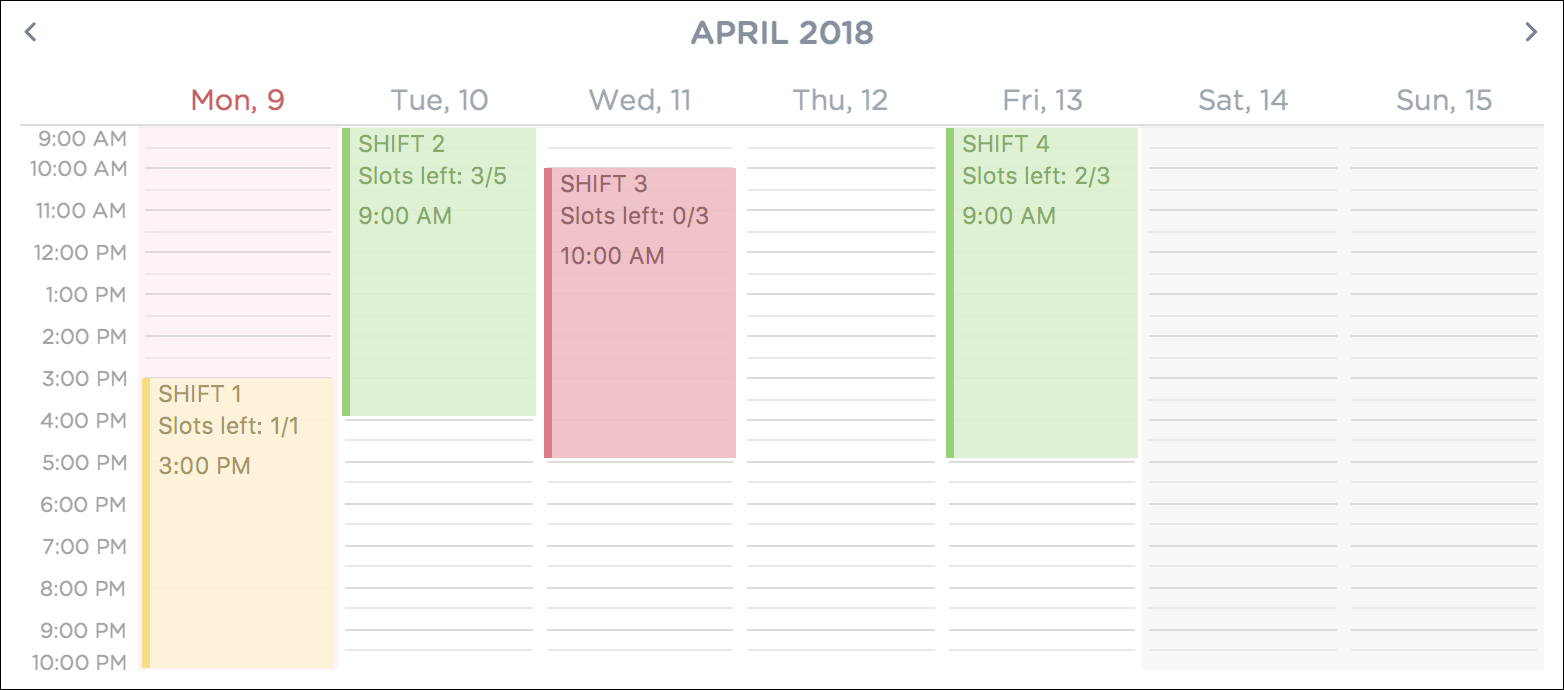
The commands DeleteShiftCommand, ApplyCommand and UnapplyCommand access the specified Shift via it’s index displayed on the timetable.
The preferred behaviour for the indexes is to have the first shift of the week start from index 1, with subsequent shifts incrementing that index.
However, having shifts that are earlier than the current timetable week will cause the first shift of the week to have an index that is greater than 1.
As seen in Figure 19 below, the shift on Monday has index 5 because there are 4 other shifts in the week(s) before the current week.
To avoid this, we only want to index shifts that are visible in the current timetable view.
This can be achieved by setting the Predicate<Shift> for the FilteredList<Shift> in ModelManager to filter shifts in the current week as shown below:
// In Model
public static Predicate<Shift> PREDICATE_SHOW_WEEK_SHIFTS = shift ->
    getWeekFromDate(shift.getDate().getLocalDate()) == getWeekFromDate(LocalDate.now());

// In ModelManager
updateFilteredShiftList(PREDICATE_SHOW_WEEK_SHIFTS);
This results in the desired shift indexing as shown in Figure 20 below.
4.3. Timetable Feature
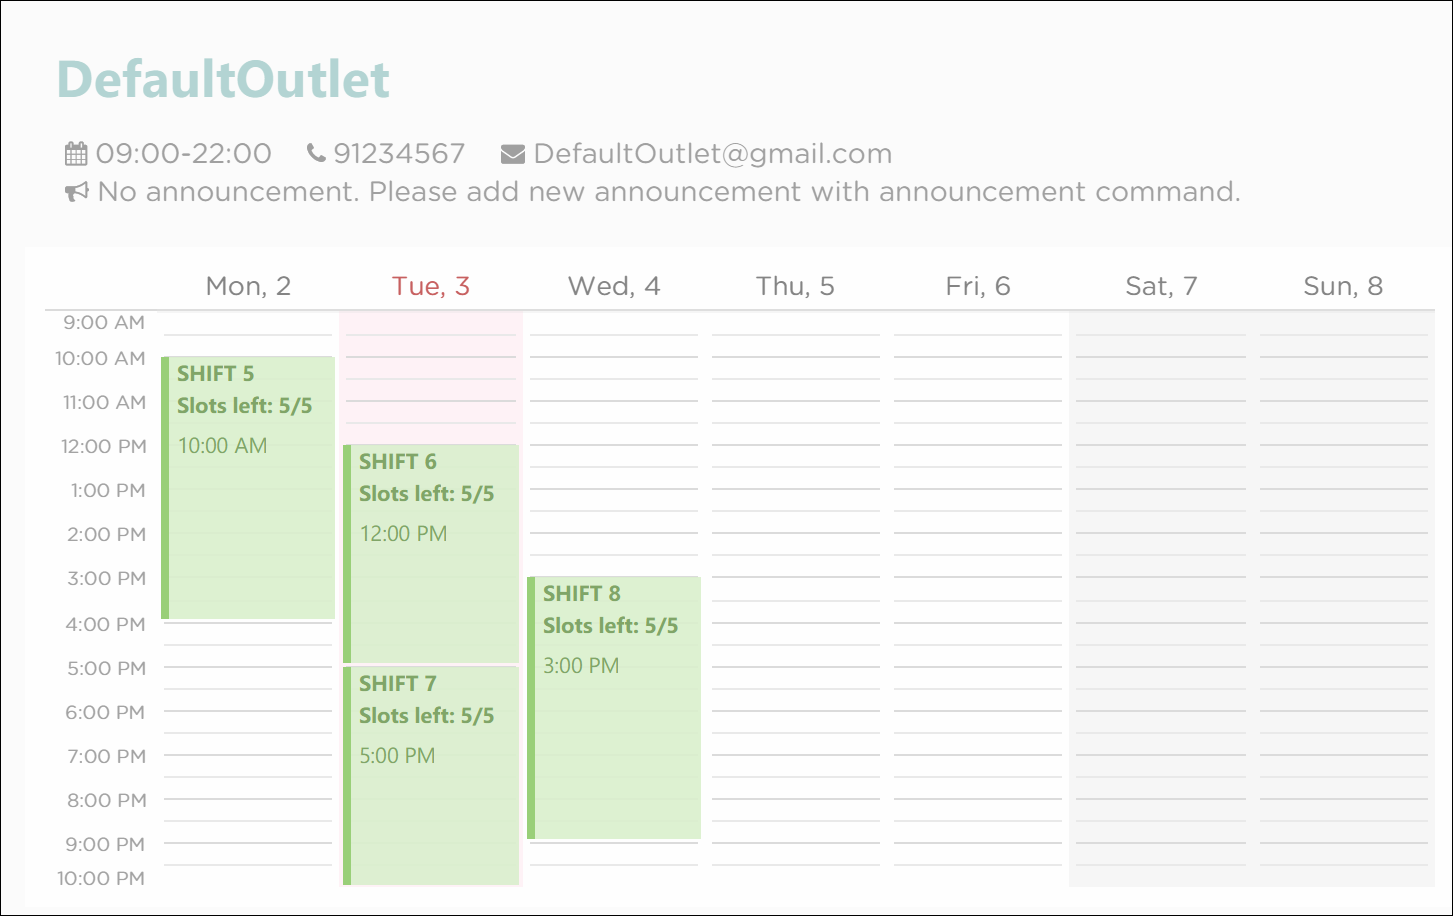
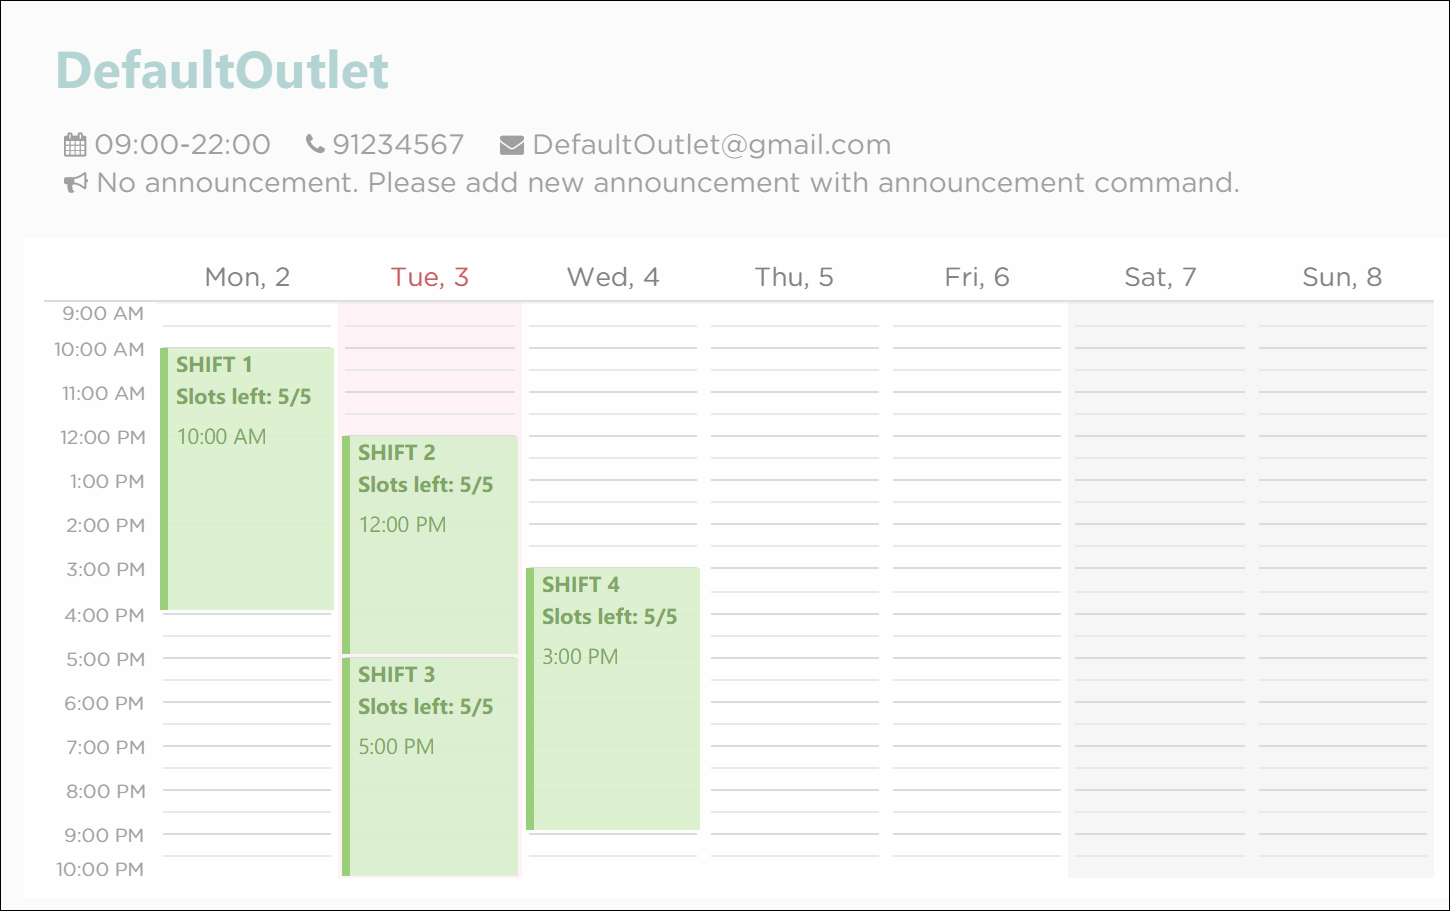
PTMan has a timetable that increases interactivity between users and shifts. Figure 21 below shows how the timetable looks like.
4.3.1. Reason for implementation
A timetable is useful for both employers and employees, as it allows them to visualise the shifts and access them via their indexes. The timetable instantly reflects any changes to the shifts and allows selected employee’s shifts to be highlighted. Users are also allowed to export the timetable as image for future reference. All in all, the timetable feature improves user experience and brings convenience to the user.
4.3.2. How it is implemented
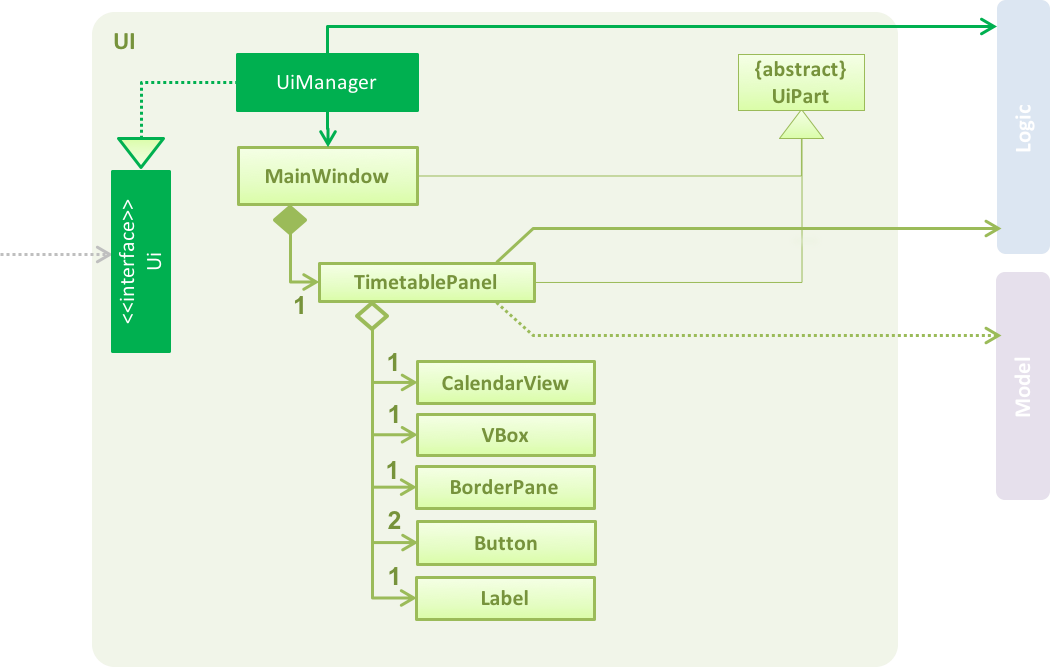
The timetable is created with the help of the CalendarFX library, and TimetablePanel
is the main class in charge of displaying the timetable.
TimetablePanel contains the following JavaFX components:
-
A
CalendarViewobject.CalendarViewis a class in CalendarFX, and it is responsible for displaying the timetable in theTimetablePanel. -
A
BorderPaneobject.BorderPaneis the object in charge of displaying the navigation bar of the timetable. -
A
Labelobject.Labelis the object in charge of displaying the text (in this case, the month and year) in the navigation bar. -
Two
Buttonobjects. Each of theButtonobject is in charge of displaying the left/right buttons in the navigation bar. It allows users to click on them to navigate through the weeks in the timetable. -
A
VBoxobject.VBoxis in charge of layingBorderPaneandCalendarViewout in a vertical column.
Figure 22 below shows a class diagram of the TimetablePanel and its association with JavaFX components.
A TimetablePanel is created with its constructor:
public TimetablePanel(Logic logic) {
    // ...
    this.logic = logic;
    this.shiftObservableList = logic.getFilteredShiftList();
    this.outletInformation = logic.getOutletInformation();
    // ...
}
Using the logic argument, the TimetablePanel constructor initialises shiftObservableList and outletInformation.
These pieces of information are important to the TimetablePanel because:
-
shiftObservableListis anObservableList<Shift>object, and is responsible for providingTimetablePanelwith the shifts required to build the timetable. Shifts are added to the timetable in the methodsetShifts(). -
outletInformationis anOutletInformationobject, and is responsible for providingTimetablePanelwith the operating hours of the outlet. The timetable re-scales according to the operating hours of the outlet, in the methodsetTimetableRange().
4.3.2.1. Updating the timetable
The main method in charge of updating the timetable is updateTimetableView().
When this method is called, the Label in the navigation bar is set to show the month that is being displayed
on the timetable, and the timetable is rebuilt with the newly set shifts and operating hours.
updateTimetableView() is called whenever a PartTimeManagerChangedEvent, TimetableWeekChangeRequestEvent or EmployeePanelSelectionChangedEvent is posted.
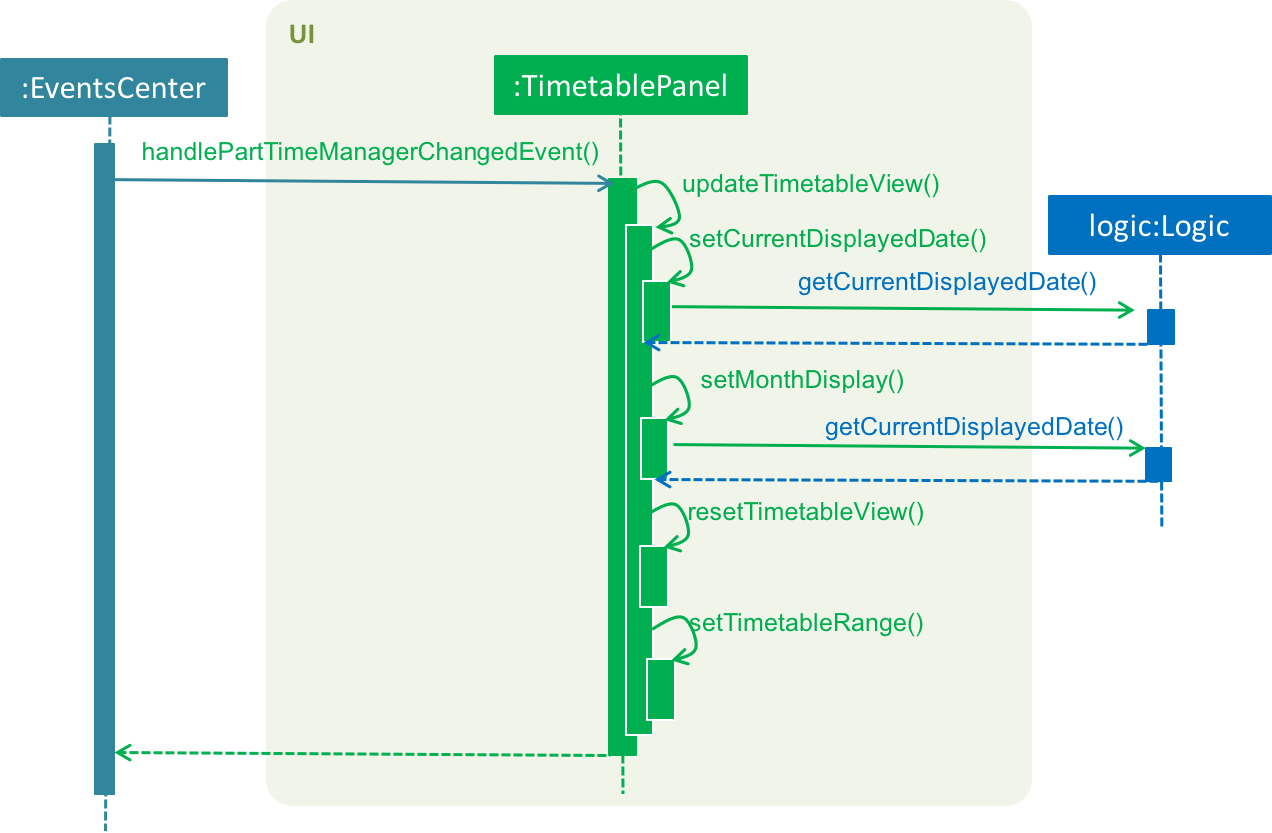
We will use PartTimeManagerChangedEvent to illustrate updateTimetableView() works.
Figure 23 below shows a high level sequence diagram of what happens when a PartTimeManagerChangedEvent
is posted and how it causes the UI to call updateTimetableView().
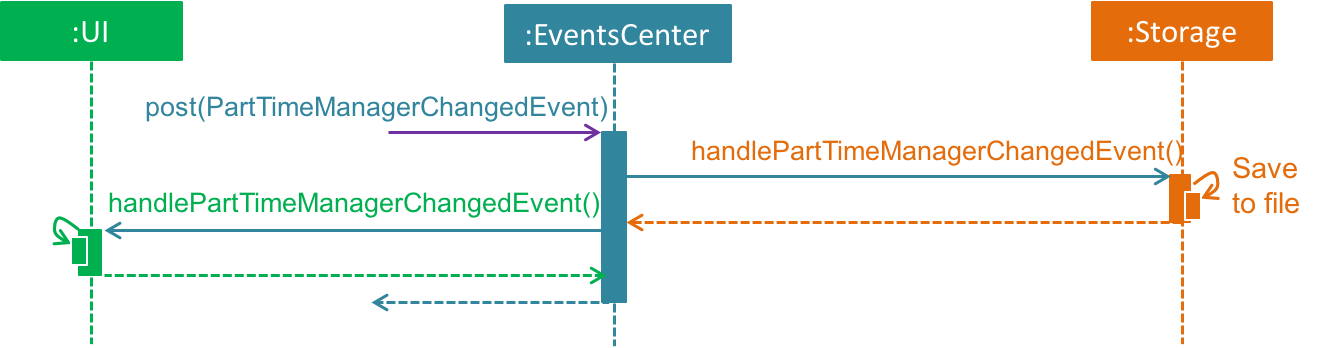
PartTimeManagerChangedEventFigure 24 below shows the sequence diagram of how TimetablePanel carries out updateTimetableView() to
respond to a PartTimeManagerChangedEvent.
Here are some examples of when updateTimetableView() is called:
-
A
Shiftis added, removed, or altered:PartTimeManagerChangedEventis posted which is handled by callingupdateTimetableView()to rebuild the timetable with the changed shifts. -
OutletInformationis edited:OutletInformationChangedEventis posted which is handled by callingupdateTimetableView()to rebuild the timetable and fit in the updated operating hours. -
The user wants to navigate the timetable to the next/previous/current week:
TimetableWeekChangeRequestEventis posted which is handled by callingnavigateToNextWeek(),navigateToPreviousWeek()ornavigateToCurrWeek()accordingly. All of these methods callupdateTimetableView()to rebuild the timetable displaying the appropriate weeks. -
Selection/Deselection of an employee:
EmployeePanelSelectionChangedEventis posted which is handled by callingloadEmployeeTimetable(employee)orloadDefaultTimetable()accordingly. Both of these methods callupdateTimetableView()to rebuild the timetable with the appropriate colours of the entries.
4.3.2.2. Commands
The following are commands that are supported as part of the timetable feature:
-
SelectCommand: Selects an employee and highlight their shifts on the timetable. -
DeselectCommand: Returns the timetable back to the default view of the current week. -
ExportCommand: Exports timetable as an image.
4.3.2.3. Viewing of individual employee’s shifts
PTMan allows employees to highlight their own shifts on the timetable through SelectCommand. When a particular employee is
being selected, EmployeePanelSelectionChangedEvent is posted with the selected employee as its argument.
EmployeePanelSelectionChangedEvent has the following constructor:
public EmployeePanelSelectionChangedEvent(EmployeeCard newSelection)
TimetablePanel subscribes to this event and handles it by calling the loadEmployeeTimetable method for the newSelection.
4.3.2.4. Returning to default view of timetable
The DeselectCommand deselects any selected employee and returns the timetable back to its default style.
EmployeePanelSelectionChangedEvent is posted with null as its argument.
TimetablePanel subscribes to this event and handles it by calling the loadDefaultTimetable method.
4.3.2.5. Exporting timetable
Exporting of the timetable is triggered by ExportCommand, which:
-
Saves the timetable as an image locally if no email address is specified, or
-
Sends the timetable as an image through email if an email address is specified.
The former posts an ExportTimetableAsImageRequestEvent, while the latter posts an ExportTimetableAsImageAndEmailRequestEvent,
both of which are subscribed to by TimetablePanel.
TimetablePanel handles them by calling exportTimetableAsImage or exportTimetableAsImageAndEmail accordingly.
The exporting works by taking a Snapshot of the timetableView node, and then writing it into a local file.
If exportTimetableAsImageAndEmail is called instead of exportTimetableAsImage, this image
will be emailed through the EmailService class, and then deleted from local storage.
4.4. Undo/Redo Feature
4.4.1. How it is implemented
The undo/redo mechanism is facilitated by an UndoRedoStack, which resides inside LogicManager. It supports undoing and redoing of commands that modifies the state of the Part-time Manager (e.g. add, edit). Such commands will inherit from UndoableCommand.
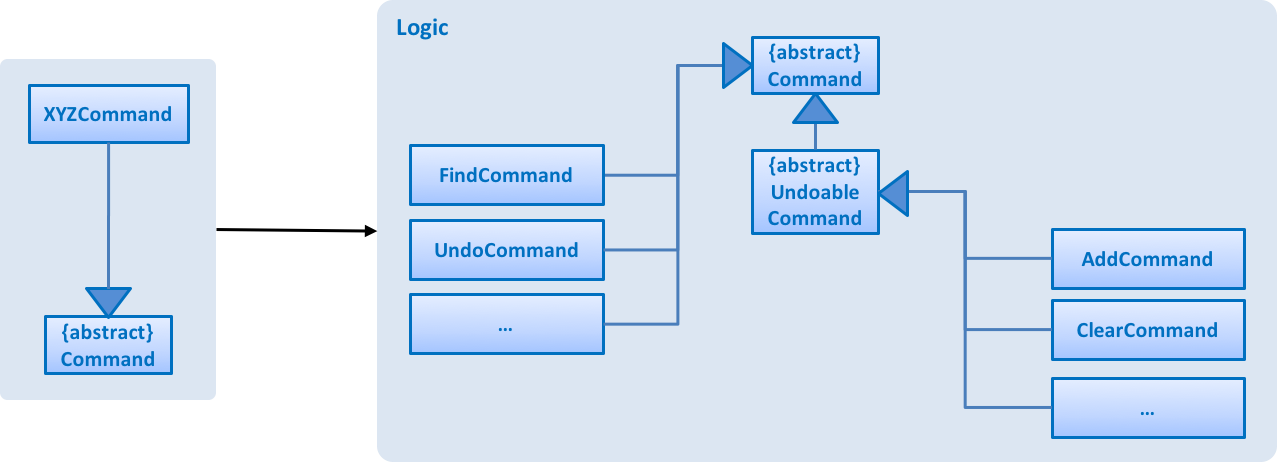
UndoRedoStack only deals with UndoableCommands. Commands that cannot be undone will inherit from Command instead. The following diagram (Figure 25) shows the inheritance diagram for commands:
As you can see from Figure 25, UndoableCommand adds an extra layer between the abstract Command class and concrete commands that can be undone, such as the DeleteCommand. Note that extra tasks need to be done when executing a command in an undoable way, such as saving the state of the Part-time Manager before execution. UndoableCommand contains the high-level algorithm for those extra tasks while the child classes implement the details of how to execute the specific command. Note that this technique of putting the high-level algorithm in the parent class and lower-level steps of the algorithm in child classes is also known as the template pattern.
Commands that are not undoable are implemented this way:
public class ListCommand extends Command {
    @Override
    public CommandResult execute() {
        // ... list logic ...
    }
}
With the extra layer, the commands that are undoable are implemented this way:
public abstract class UndoableCommand extends Command {
    @Override
    public CommandResult execute() {
        // ... undo logic ...

        executeUndoableCommand();
    }
}

public class DeleteCommand extends UndoableCommand {
    @Override
    public CommandResult executeUndoableCommand() {
        // ... delete logic ...
    }
}
Suppose that the user has just launched the application. The UndoRedoStack will be empty at the beginning.
The user executes a new UndoableCommand, delete 5, to delete the 5th person in the Part-time Manager. The current state of the Part-time Manager is saved before the delete 5 command executes. The delete 5 command will then be pushed onto the undoStack (the current state is saved together with the command) as shown in Figure 26.

delete 5 Command in Undo and Redo Stack
As the user continues to use the program, more commands are added into the undoStack. For example, the user may execute add n/David … to add a new person, as shown in Figure 27.
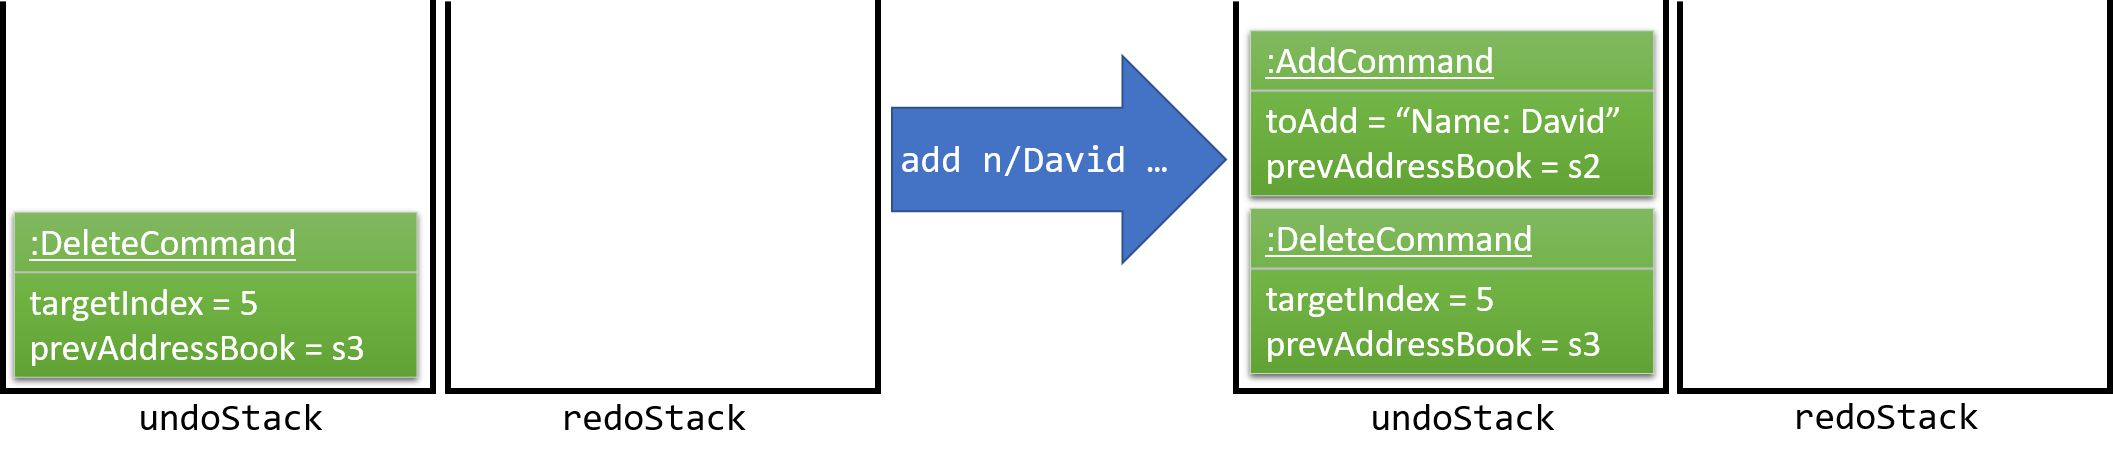
add n/David … Command in Undo and Redo Stack
If a command fails its execution, it will not be pushed to the UndoRedoStack at all.
|
The user now decides that adding the person was a mistake, and decides to undo that action using undo.
We will pop the most recent command out of the undoStack and push it back to the redoStack. We will restore the Part-time Manager to the state before the add command executed as shown in Figure 28..
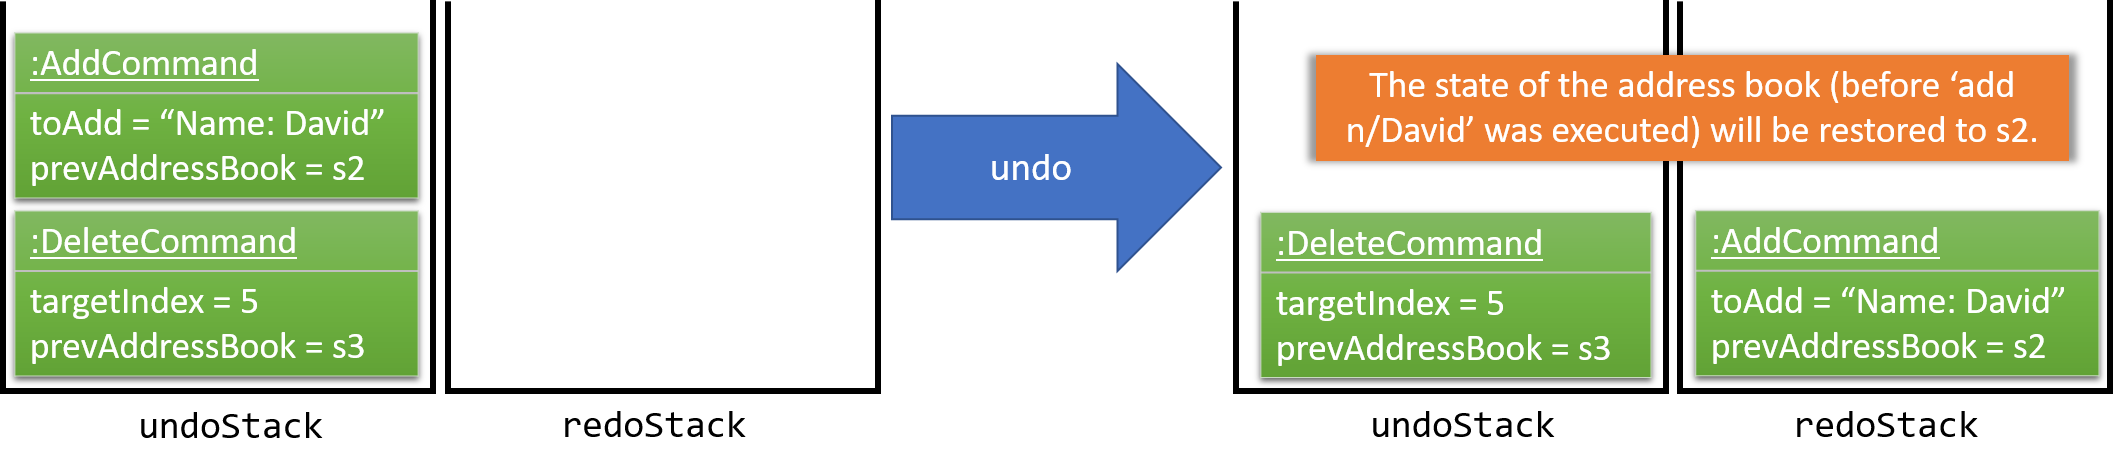
undo Command in Undo and Redo Stack
If the undoStack is empty, then there are no other commands left to be undone, and an Exception will be thrown when popping the undoStack.
|
The following sequence diagram (Figure 29) shows how the undo operation works:

The redo does the exact opposite (pops from redoStack, push to undoStack, and restores the Part-time Manager to the state after the command is executed).
If the redoStack is empty, then there are no other commands left to be redone, and an Exception will be thrown when popping the redoStack.
|
The user now decides to execute a new command, clear. As before, clear will be pushed into the undoStack. This time the redoStack is no longer empty. It will be purged as it no longer makes sense to redo the add n/David command (this is the behavior that most modern desktop applications follow). Figure 30 shows changes in undoStack and redoStack after a clear command.

clear Command in Undo and Redo StackCommands that are not undoable are not added into the undoStack. For example, list, which inherits from Command rather than UndoableCommand, will not be added after execution, as shown in Figure 31.

list Command in Undo and Redo Stack
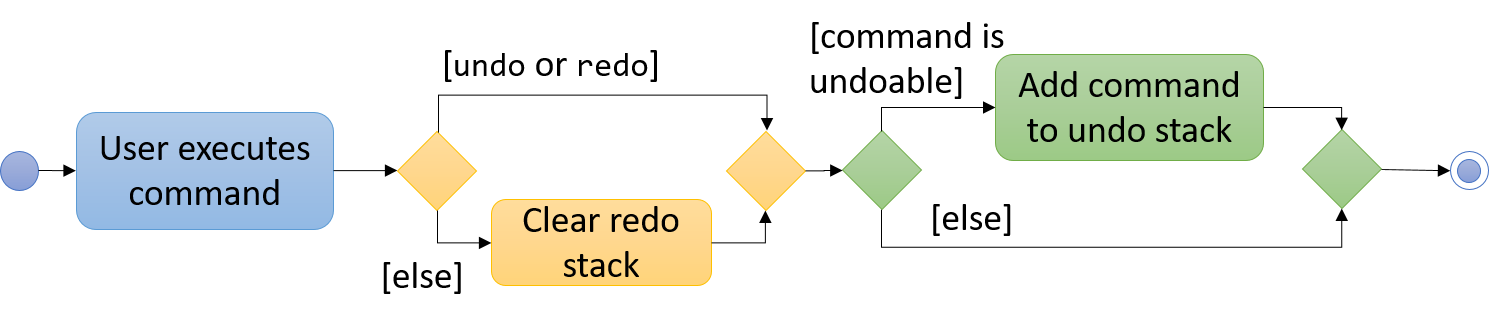
The following activity diagram summarize what happens inside the UndoRedoStack when a user executes a new command, as shown in Figure 32.
4.4.2. Design considerations
This section highlights the considerations behind our application’s design choices.
4.4.2.1. Aspect: implementation of UndoableCommand
-
Alternative 1 (current choice): Add a new abstract method
executeUndoableCommand().-
Pros: We will not lose any undone/redone functionality as it is now part of the default behaviour. Classes that deal with
Commanddo not have to know thatexecuteUndoableCommand()exist. -
Cons: Hard for new developers to understand the template pattern.
-
-
Alternative 2: Just override
execute()-
Pros: Does not involve the template pattern, easier for new developers to understand.
-
Cons: Classes that inherit from
UndoableCommandmust remember to callsuper.execute(), or lose the ability to undo/redo.
-
4.4.2.2. Aspect: how undo & redo executes
-
Alternative 1 (current choice): Saves the entire Part-time Manager.
-
Pros: Easy to implement.
-
Cons: May have performance issues in terms of memory usage.
-
-
Alternative 2: Individual command knows how to undo/redo by itself.
-
Pros: Will use less memory (e.g. for
delete, just save the person being deleted). -
Cons: We must ensure that the implementation of each command is correct.
-
4.4.2.3. Aspect: type of commands that can be undone/redone
-
Alternative 1 (current choice): Only include commands that modify the Part-time Manager (
add,clear,edit).-
Pros: We only revert changes that are hard to change back (the view can easily be re-modified as no data are lost).
-
Cons: User might think that undo also applies when the list is modified (undoing filtering for example), only to realize that it does not do that, after executing
undo.
-
-
Alternative 2: Include all commands.
-
Pros: PTMan might be more intuitive for the user.
-
Cons: User has no way of skipping such commands if he or she just want to reset the state of PTMan and not the view. Additional Info: See our discussion here.
-
4.4.2.4. Aspect: data structure to support the undo/redo commands
-
Alternative 1 (current choice): Use separate stack for undo and redo
-
Pros: Easy to understand for new Computer Science undergraduates, who are likely to be the new incoming developers of our project.
-
Cons: Logic is duplicated twice. For example, when a new command is executed, we must remember to update both
HistoryManagerandUndoRedoStack.
-
-
Alternative 2: Use
HistoryManagerfor undo/redo-
Pros: We do not need to maintain a separate stack, and just reuse what is already in the codebase.
-
Cons: Requires dealing with commands that have already been undone: We must remember to skip these commands. Violates Single Responsibility Principle and Separation of Concerns as
HistoryManagernow needs to do two different things.
-
4.5. Password Feature
4.5.1. Reason for implementation
As PTMan is currently designed to use locally on a system, both employer and employee must go through the same system to allocate their preferred slot or to edit the data in PTMan. A Password class is given to both employer and employee to ensure that they are the authorized person that is using the system.
4.5.2. How it is implemented
A Password class is created with two constructors.
new Password();
new Password(String hashCode);
new Password() produce hash code converted by SHA-256 using the default password "DEFAULT1" and store it within the class.
new Password(String hashCode) allows storage to directly insert the generated hash code to create the password class upon loading.
| To create a password with desired password String, one can invoke the method below. |
createPassword(String password)
As of version 1.2, each person and outlet now has a Password class. You may refer to Figure 33 for an overview of the Password class.
The reason of converting password string to hashCode is to protect user’s password from being seen in the storage file. Anyone who get hold of the data are not able to convert the hashCode back to the original password string as SHA-256 is a collision resistant hash.
4.6. Admin Mode and Command Feature
4.6.1. Reason for implementation
Initial startup of PTMan require huge amount of manual input by admin. To promote hassle-free commands, employers can log in to admin mode with login command and use the command provided without the need to be autheticated for every command.
4.6.2. How it is implemented (admin mode)
Model component now implement three new API for logic component to use.
boolean isAdminMode();
boolean setTrueAdminMode(Password password);

/** guarantee to set adminMode to false */
setFalseAdminMode();
setTrueAdminMode(Password password) requires a password that will check against the outlet password and set admin mode accordingly. Failing to give the correct password will result in returning false.
4.6.3. How it is implemented (admin command)
In order to enable commands to be usable only in admin mode the code below must be added to the execution() of the command first.
if (!model.isAdminMode()) {
    throw new CommandException(MESSAGE_ACCESS_DENIED);
}
Figure 34 below illustrates how the admin command is generally executed.
delete 1 Admin Command4.7. Email Service Feature
4.7.1. Reason for implementation
Email service can be useful to send reset password and notification to employee. To facilitate easy sending of email, a singleton EmailService class is introduced.
4.7.2. How it is implementation
To get an instance of the email service the following code can be called anywhere.
EmailService.getInstance();
Currently, there are two specialized methods in EmailService class that can be used to send email.
sendTimetableAttachment(String email, String filename)
sendResetPasswordMessage(String name, String email, String newPassword)
sendTimetableAttachment crafts a specialized email and send to the specified email with attachment from filename.
sendResetPasswordMessage crafts a specialized email and send to the specified email to the intended personnel.
EmailService class is free for extension.
|
4.8. Backup Storage
4.8.1. Reason for implementation
Sometimes local storage files might be corrupted due to accidents. It is important to keep backup files to prevent any loss of essential data.
4.8.2. How it is implemented
Currently, backup files are stored with file extension ".backup" in the same folder as local storage files.
Backup files are updated upon exit of the app.
It is implemented by calling backupPartTimeManager(ReadOnlyPartTimeManager partTimeManager) and backupOutletInformation(OutletInformation outletInformation) in the MainApp.java as shown below:
public void stop() {
    ...
    storage.backupPartTimeManager(model.getPartTimeManager());
    storage.backupOutletInformation(model.getOutletInformation());
    ...
}
An alternative implementation would be not only saving backup files but also sending them to the cloud such as Dropbox and Google Drive. It can be done using the respective Dropbox and Google Drive APIs.
4.9. Logging
We are using the java.util.logging package for logging. The LogsCenter class is used to manage the logging levels and logging destinations.
-
The logging level can be controlled using the
logLevelsetting in the configuration file. (See Section 4.10) -
The
Loggerfor a class can be obtained usingLogsCenter.getLogger(Class)which will log messages according to the specified logging level. -
Currently, log messages are output to
Consoleand to a.logfile.
Logging Levels
-
SEVERE: Logs critical problems which may possibly cause the termination of the application. -
WARNING: Logs potential problems. -
INFO: Logs the noteworthy actions of app. -
FINE: Logs details that are not usually noteworthy but may be useful in debugging e.g. printing the actual list instead of just it’s size.
4.10. Configuration
Certain properties of the application can be controlled (e.g app name, logging level) through the configuration file (default: config.json).
5. Documentation
This section describes how to edit, publish and convert documentation. We use asciidoc for writing documentation.
| We chose asciidoc over Markdown because asciidoc, although a bit more complex than Markdown, provides more flexibility in formatting. |
5.1. Editing Documentation
See UsingGradle.adoc to learn how to render .adoc files locally to preview the end result of your edits.
Alternatively, you can download the AsciiDoc plugin for IntelliJ, which allows you to preview the changes you have made to your .adoc files in real-time.
5.2. Publishing Documentation
See UsingTravis.adoc to learn how to deploy GitHub Pages using Travis.
5.3. Converting Documentation to PDF Format
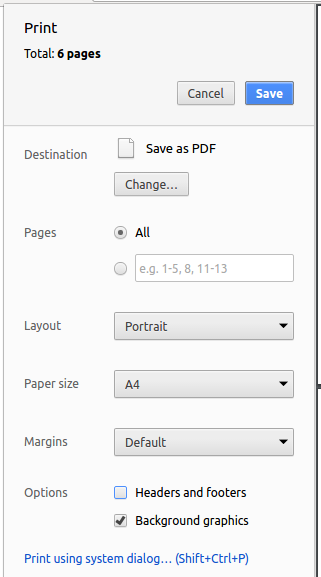
We use Google Chrome for converting documentation to PDF format, as Chrome’s PDF engine preserves hyperlinks used in webpages.
Here are the steps to convert the project documentation files to PDF format:
-
Follow the instructions in UsingGradle.adoc to convert the AsciiDoc files in the
docs/directory to HTML format. -
Go to
build/docsfolder, your should see the generated HTML files. -
Right click on the file and select
Open with→Google Chrome. You should see a Google Chrome window. -
Click on the
Printoption in Chrome’s menu. You should see aPrintwindow as shown in Figure 35 below. -
Set the destination to
Save as PDF. -
Click
Saveto save a copy of the file in PDF format. For the best results, use the settings indicated in Figure 35.
6. Testing
This section explains how to run the different types of tests and test troubleshooting.
6.1. Running Tests
There are three ways to run tests.
| The most reliable way to run tests is the third one. The first two methods might fail in some GUI tests due to platform/resolution-specific idiosyncrasies. |
Method 1: Using IntelliJ JUnit Test Runner
-
Right-click on the
src/test/javafolder and chooseRun 'All Tests'to run all tests. -
Right-click on a test package, test class, or a test and choose
Run 'ABC'to run a subset of tests.
Method 2: Using Gradle
-
Open a console and run the command
gradlew clean allTests. If you are using Mac/Linux system, run the command./gradlew clean allTestsinstead.
| See UsingGradle.adoc for more information on how to run tests using Gradle. |
Method 3: Using Gradle (Headless)
-
Open a console and run the command
gradlew clean headless allTeststo run tests in headless mode. If you are using Mac/Linux system, run the command./gradlew clean headless allTestsinstead.
| Thanks to the TestFX library, our GUI tests can be run in the headless mode. In the headless mode, GUI tests do not show up on the screen. That means the developer can do other things on the computer while the tests are running. |
6.2. Types of Tests
We have two types of tests:
-
GUI Tests
These are tests involving the GUI. They include:-
System tests test the entire app by simulating user actions on the GUI. These are in the
systemtestspackage. -
Unit tests test the individual UI components. These are in the
seedu.ptman.uipackage.
-
-
Non-GUI Tests
These are tests not involving the GUI. They include:-
Unit tests test methods/classes at the lowest level.
e.g.seedu.ptman.commons.StringUtilTest -
Integration tests test the integration of multiple code units. Those code units are assumed to be working.
e.g.seedu.ptman.storage.StorageManagerTest -
Hybrids of unit and integration tests test multiple code units as well as how they are connected together.
e.g.seedu.ptman.logic.LogicManagerTest
-
6.3. Troubleshooting Testing
The common problems encountered while testing are listed here.
Problem: HelpWindowTest fails with a NullPointerException.
-
Reason: One of its dependencies,
UserGuide.htmlinsrc/main/resources/docsis missing. -
Solution: Execute Gradle task
processResources.
7. Dev Ops
The following sections help you ensure that the project is fully integrated, tested, and built for release.
7.1. Build Automation
See UsingGradle.adoc to learn how to use Gradle for build automation.
7.2. Continuous Integration
We use Travis CI and AppVeyor to perform continuous integration on our projects. See UsingTravis.adoc and UsingAppVeyor.adoc for more details.
7.3. Coverage Reporting
We use Coveralls to track the code coverage of our projects. See UsingCoveralls.adoc for more details.
7.4. Documentation Previews
When a pull request has changes to asciidoc files, you can use Netlify to see a preview of how the HTML version of those asciidoc files will look like when the pull request is merged. See UsingNetlify.adoc for more details.
7.5. Making a Release
Here are the steps to create a new release:
-
Update the version number in
MainApp.java. -
Generate a JAR file using Gradle.
-
Tag the repo with the version number. e.g.
v0.1 -
Create a new release using GitHub and upload the JAR file you created.
7.6. Managing Dependencies
A project often depends on third-party libraries. For example, PTMan depends on the Jackson library for XML parsing. Managing these dependencies can be automated using Gradle. One advantage of Gradle is that it can download these dependencies automatically, which is better than the below alternatives:
-
Including the third-party libraries in the repo. This bloats the repo size.
-
Making developers download the third-party libraries manually. This creates extra work for developers.
Appendix A: Product Scope
Target user profile:
-
has a need to manage part-time employees.
-
wants to give employees flexibility in their working hours.
-
can type fast.
-
prefers typing over mouse input.
-
is reasonably comfortable using CLI apps.
Value proposition: manage part-time employees faster than a typical mouse/GUI driven app
A.1. Feature Contribution
Shannon:
-
Shifts (Major):
-
Add/remove shifts: Added commands for the employer to add/remove shifts. Employees can then view the available shifts, their working hours, and the capacity of each shift.
-
Select/Deselect shifts: Added commands for employees to choose the shifts they want to work in.
-
-
Command aliases (Minor): Added aliases to most commands. These aliases can be used in place of the full length commands for the user’s convenience.
Chin Chye:
-
Access Control (Major):
-
Password: Give password to every employee and outlet to protect from accidental/misuse of command.
-
Login for edit/admin Mode: Using the password in outlet, employer are able to login to access admin functions.
-
Change/reset password command: Employee and employer are able to change/reset password to keep their data/password a secret.
-
-
Salary (Minor): Added salary to employee. This variable is used to keep track of how much employee has earned so far.
Caryn:
-
Timetable (Major):
-
Timetable view: Added the interactive timetable for users to interact through the Shift commands.
-
Export timetable: Added a command for exporting timetable as image.
-
View shifts applied by employee: Modified a command for employees to view their own shifts on the timetable.
-
View employees working in shift: Added a command for listing employees working in any particular shift.
-
-
Tag colors (Minor): Added different colors for different tags inside person cards. Tags are allocated colors based on their hashcode.
Bangjie:
-
Outlet Feature(Major):
-
Edit outlet information: Commands are added for the employers to edit outlet information, including outlet name and operating hours.
-
Create announcement: Announcement command is added for the employers to broadcast important messages to all employees.
-
Display outlet information: Outlet information will be displayed in the UI. Any change in the outlet information will be reflected as well.
-
Store outlet information: Outlet information is stored in a separate file.
-
Data encryption: Storage files can be encrypted and decrypted on command to ensure that data cannot be obtained and understood by any third party.
-
-
Backup storage files (Minor): Backup files with file extension ".backup" are created and updated upon exit of the app.
Appendix B: User Stories
Priorities: High (must have) - * * *, Medium (nice to have) - * *, Low (unlikely to have) - *
| Priority | As a … | I want to … | So that I can… |
|---|---|---|---|
|
user |
have a user manual |
know how to use the app. |
|
user |
have access control |
prevent unauthorized access to my information. |
|
user |
update my password |
keep my information secure. |
|
user |
reset my password |
reset when i forget my password. |
|
user |
constantly back up my local files |
retrieve important information if some files are corrupted. |
|
user |
navigate through the weeks of the timetable |
manage shifts ahead of time, and revisit old shifts. |
|
employer |
add a new employee |
store them in the record. |
|
employer |
add an employee to a shift |
assign employees to their shifts. |
|
employer |
remove an employee from a shift |
reassign employees their shifts. |
|
employer |
view employees working in a shift |
keep track of who is working. |
|
employer |
view an employee’s contact |
contact them. |
|
employer |
view an employee’s salary |
view their salary. |
|
employer |
edit an employee’s salary |
update their salary. |
|
employer |
delete an existing employee |
remove employees that are no longer working. |
|
employer |
update the schedule |
show employees the available slots. |
|
employer |
encrypt and decrypt local storage files on demand |
prevent unauthorised users from retrieving local file data. |
|
employee |
view the schedule |
choose when I want to work. |
|
employee |
select from the available slots in the schedule |
work during that slot. |
|
employer |
edit an employee’s contact |
update their outdated contact information. |
|
employer |
edit the outlet information |
update the outdated outlet information. |
|
employer |
sort employees by name |
have a clearer view of all employees’ details. |
|
employer |
find an employee by name |
locate details of employees without having to go through the entire list. |
|
employer |
view an employee’s address |
view their address information. |
|
employer |
edit an employee’s address |
update their outdated address. |
|
employee |
view my own shifts in the timetable |
so that I can easily recall when I need to work. |
|
employee |
export timetable as image |
have easy access to the time slots I’m working at. |
|
employee |
edit my contact and address |
update my particulars. |
|
employee |
view my salary so far for the month |
plan my expenses. |
|
employer |
add an employee’s photo |
view it at any time. |
|
employer |
edit an employee’s photo |
change an employee’s photo to a newer one. |
|
employer |
view an employee’s photo |
recognize the employee. |
|
employer |
remove an employee’s photo |
remove their old photo. |
|
employee |
add a photo |
be easily identified by my employer. |
|
employee |
have a notification for slot confirmation |
be assured that I am working at that slot. |
Appendix C: Use Cases
(For all use cases below, the System is the PTMan and the Actor is the employer, unless specified otherwise)
C.1. Use Case: Add Employee
MSS
-
Employer logs in to their admin account.
-
Employer enters the employee’s details.
-
PTMan adds the employee.
Use case ends.
Extensions
-
2a. The entered format is invalid.
-
2a1. PTMan shows an error message.
Use case resumes at step 1.
-
C.2. Use Case: Add Shift
MSS
-
Employer logs in to their admin account.
-
Employer enters the shift details.
-
PTMan adds the shift.
Use case ends.
Extensions
-
2a. The entered format is invalid.
-
2a1. PTMan shows an error message.
Use case resumes at step 1.
-
C.3. Use Case: Delete Shift
MSS
-
Employer logs in to their admin account.
-
Employer enters the shift’s index.
-
PTMan deletes the shift.
Use case ends.
Extensions
-
2a. The entered format is invalid.
-
2a1. PTMan shows an error message.
Use case resumes at step 2.
-
-
2b. The entered index does not exist.
-
2b1. PTMan shows an error message.
Use case resumes at step 2.
-
C.4. Use Case: Delete Employee
MSS
-
Employer requests to list employees.
-
PTMan shows a list of employees.
-
Employer requests to delete a specific employee in the list.
-
PTMan deletes the employee.
Use case ends.
Extensions
-
2a. The list is empty.
Use case ends.
-
3a. The given index is invalid.
-
3a1. PTMan shows an error message.
Use case resumes at step 2.
-
C.5. Use Case: Edit Employee
MSS
-
Employer logs in to their admin account.
-
Employer enters the employee’s index and the new details of the employee.
-
PTMan changes the employee’s details.
Use case ends.
Extensions
-
2a. The entered format is invalid.
-
2a1. PTMan shows an error message.
Use case resumes at step 2.
-
-
2b. The employee cannot be found.
-
2b1. PTMan shows an error message.
Use case resumes at step 2.
-
-
2c. The entered format of new details is invalid.
-
2c1. PTMan shows an error message.
Use case resumes at step 2.
-
C.6. Use Case: Edit Outlet Information
MSS
-
Employer logs in to their admin account.
-
PTMan changes to admin mode.
-
Employer enters new values for outlet.
-
PTMan changes the outlet’s details.
Use case ends.
Extensions
-
3a. The entered format is invalid.
-
3a1. PTMan shows an error message.
Use case resumes at step 3.
-
-
3b. The entered format of new details is invalid.
-
3b1. PTMan shows an error message.
Use case resumes at step 3.
-
C.7. Use Case: Sign Up for Available Shifts
MSS
-
Employee enters a shift that he wants to work in.
-
PTMan sends a confirmation message to the employee.
-
PTMan updates the indicated time slot in the timetable of the indicated outlet.
Use case ends.
Extensions
-
1a. The entered format is invalid.
-
1a1. PTMan shows an error message.
Use case resumes at step 1.
-
-
1b. The shift is full.
-
1b1. PTMan shows an error message.
Use case resumes at step 1.
-
Use Case: Encrypt Local Files
MSS
-
Employer requests to encrypt local files.
-
PTMan encrypts local files and sends a confirmation message to the employer.
Use case ends.
Extensions
-
1a. The entered format is invalid.
-
1a1. PTMan shows an error message.
Use case resumes at step 1.
-
-
1b. Local files have already been encrypted.
-
1b1. PTMan shows an error message.
Use case resumes at step 1.
-
Non Functional Requirements
-
Should work on any mainstream OS as long as it has Java
1.8.0_60or higher installed. -
Should work on both 32-bit and 64-bit environment.
-
Should be able to hold up to 1000 persons without a noticeable sluggishness in performance for typical usage.
-
A user with above average typing speed for regular English text (i.e. not code, not system admin commands) should be able to accomplish most of the tasks faster using commands than using the mouse.
-
Should respond within 2 seconds after entering any command.
-
Should be able to use by users who has never used a command line interface before.
-
Should be able to manage contact details of part-time workers in any outlet.
-
Should be able to manage work schedule in any outlet.
-
Should not be required to handle the printing of contact details and schedules.
Appendix E: Instructions for Manual Testing
Given below are instructions to test the app manually.
| These instructions only provide a starting point for testers to work on; testers are expected to do more exploratory testing. |
E.1. Launch and Shutdown
-
Initial launch
-
Download the jar file and copy into an empty folder
-
Double-click the jar file
Expected: Shows the GUI with a set of sample contacts. The window size may not be optimum.
-
-
Saving window preferences
-
Resize the window to an optimum size. Move the window to a different location. Close the window.
-
Re-launch the app by double-clicking the jar file.
Expected: The most recent window size and location is retained.
-
E.2. Admin Mode Logging in / Logging out
-
Logging in to admin mode in order to do admin-only commands.
-
Prerequisites: It must be your first login and you did not change the admin password.
-
Test case:
login pw/DEFAULT1
Expected: log in successfully and you will see red sign "Admin Mode" at the top right corner of the app. -
Test case:
login pw/wrongPassword123
Expected: login fails.
-
-
Logging out of admin mode.
-
Test case:
logout
Expected: If you logged in, now you will log out and red sign "Admin Mode" will disappear. Otherwise, you cannot log out again.
-
E.3. Editing Outlet Information
-
Editing outlet information
-
Prerequisites: Login with the correct admin password. Make sure you are in the admin mode. (The default admin password is
DEFAULT1) -
Test case:
editoutlet n/Cool Coffee h/1000-2000 c/92223333 e/coolcoffee@gmail.com
Expected: Outlet information displayed changes accordingly. Timetable resizes accordingly. -
Test case:
editoutlet n/Cool Tea NUS
Expected: Outlet information displayed changes accordingly. -
Test case:
editoutlet n/Cool Tea @ NUS
Expected: No outlet information is changed. Error details shown in the status message. -
Test case:
editoutlet h/2000-1000
Expected: No outlet information is changed. Error details shown in the status message.
-
-
Editing announcement
-
Prerequisites: Login with the correct admin password. Make sure you are in the admin mode. (The default admin password is
DEFAULT1) -
Test case:
announcement It is a new announcement!
Expected: Announcement displayed changes accordingly. -
Test case:
announce It is another announcement!
Expected: Announcement displayed changes accordingly.
-
E.4. Changing Password
-
Changing admin password.
-
Prerequisites: Login with the correct admin password. Make sure you are in the admin mode. (The default admin password is
DEFAULT1) -
Test case:
changeadminpw pw/DEFAULT1 pw/newPassword pw/newPassword
Expected: Your master password changed successfully and now you can login with the new password. -
Test case:
changeadminpw pw/WRONG_PASSWORD pw/newPassword pw/newPassword
Expected: Your old password is incorrect. Error details shown in the status message.
-
E.5. Resetting Password
-
Resetting admin password.
-
Prerequisites: Make sure the email address of the outlet is valid (your own email address for testing) and Internet is in good condition. Otherwise, you are unable to receive the email.
-
Test case:
resetadminpwExpected: Email will be sent to the outlet email address after a few seconds depending on your Internet speed.
Note: You can now log in with the password sent to you. It is a temporary password, you must change ur password immediately.
-
E.6. Adding a Shift
-
Adding a Shift
-
Test case:
addshift d/21-04-18 ts/1200 te/1500 c/5
Expected: A shift is successfully added. -
Test case:
addshift d/10-03-18 ts/1200 te/1500 c/5
Expected: No shift added. Error details shown in the status message. -
Test case:
addshift d/21-04-18 ts/1600 te/1500 c/5
Expected: No shift added. Error details shown in the status message.
-
E.7. Deleting a Shift
-
Deleting a Shift
-
Test case:
deleteshift 1
Expected: A chosen shift is deleted. Shift indices updated. -
Test case:
deleteshift xwhere x is larger than all the shift indices in the timetable.
Expected: No shift deleted. Error details shown in the status message.
-
E.8. Applying an Employee for a Shift
-
Applying an employee for a shift
-
Prerequisites: Login with the correct admin password. Make sure you are in the admin mode. (The default admin password is
DEFAULT1). Make sure you have added some shifts. -
Test case:
apply 1 1
Expected: The first employee is successfully added to the first shift. -
Test case:
apply 1 1again
Expected: Employee is already in the shift. Error details shown in the status message. -
Test case:
apply 1 xwhere x is a shift on a past date, or an invalid index. Expected: Error details shown in the status message.
-
E.9. Unapplying an Employee from a Shift
-
Unapplying an employee from a shift
-
Prerequisites: Login with the correct admin password. Make sure you are in the admin mode. (The default admin password is
DEFAULT1). Make sure you have added some employees into some shifts. -
Test case:
unapply 1 1
Expected: The first employee is successfully removed from the first shift. -
Test case:
unapply 1 1again
Expectd: Employee is not in the shift as just removed. Error details shown in the status message.
-
E.10. Displaying an Employee’s Shift on the Timetable
-
Displaying an employee on the timetable
-
Test case:
select 1→apply 1 1
Expected: You can see shift 1 colour has changed from brown to blue, indicating that the first employee is enrolled in shift 1.
-
E.11. Viewing All Employees in a Shift
-
Viewing all employees in a shift
-
Prerequisites: Make sure you have added some shifts and added some employees into the shifts.
-
Test case:
viewshift 1
Expected: Correct number of employees listed in employee list.
-
E.12. Encrypting and Decrypting Local Storage Files
-
Encrypting local storage files
-
Prerequisites: Login with the correct admin password. Make sure you are in the admin mode. (The default admin password is
DEFAULT1) -
Test case:
encrypt
Expectd: If your files are not encrypted, after this command, files will be encrypted after a few seconds. If your files have already been encrypted, after this command, files will not be affected and error details will be shown in the status message.
-
-
Decrypting local storage files
-
Prerequisites: Login with the correct admin password. Make sure you are in the admin mode. (The default admin password is
DEFAULT1) -
Test case:
decrypt
Expectd: If your files are encrypted, after this command, files will be decrypted after a few seconds. If your files have already been decrypted, after this command, files will not be affected and error details will be shown in the status message.
-
E.13. Saving and Recovering Data
-
Dealing with missing/corrupted data files
-
Prerequisites: You have already run the app once, and exited. You will see files with extension ".backup" in
datafolder. -
Simulate missing/corrupted data files:
-
Open
datafolder. -
Delete "parttimemanager.xml" and "outletinformation.xml".
-
Copy "parttimemanager.xml.backup" and "outletinformation.xml.backup" to another folder.
-
-
Recover data:
-
Rename "parttimemanager.xml.backup" to "parttimemanager.xml".
-
Rename "outletinformation.xml.backup" to "outletinformation.xml".
-
Paste those two files back into
datafolder. -
Run the app and you will see data recovered.
-
-
If both of your
.xmland.backupfiles are missing/corrupted, you are unable to recover data. -
If you feel that data read from local files are not correct, DO NOT close the app. Quickly copy and paste
.backupfiles into another folder and followrecover dataprocedures.
-