Overview
PTMan is a desktop human resource application used for managing part-time employees.
PTMan aims to give part-time employees the freedom of choosing when they want to work by registering for the available shifts set by the manager.
Thereby reducing the hassle of work scheduling for both employers and employees.
The user interacts with the application using a CLI, and it has a GUI created with JavaFX. It is written in Java, and has about 10 kLoC.
Summary of contributions
-
Major enhancement: Added an interactive timetable.
-
What it does:
-
Provides a sophisticated timetable which displays the shifts added by managers.
-
Instantly reflects any changes to shifts on the timetable. This includes the addition/deletion of a shift, and the application/removal of an employee to/from a shift.
-
Allows easy navigation across the different weeks through keyboard shortcuts or mouse clicks.
-
Allows employees to view the shifts they are assigned to on the timetable.
-
Allows users to view which employees are working in any particular shift.
-
Supports the exporting of timetable as image to be saved as a file locally, or forwarded to users through our email service.
-
-
Justification: This feature improves the user experience of PTMan significantly because a user can get helpful visual feedback whenever changes are made to the shifts in PTMan. Convenience is also brought to employees through the ability to export their work timetable, allowing them to refer to it in the future without the need to access the app.
-
Highlights: This enhancement puts user experience in high regard. Lots of consideration is put into making the feature easy to use and useful for users. The implementation of this enhancement mainly required changes to Ui, Model, and Logic components.
-
Credits: CalendarFX
-
-
Minor enhancement:
-
Allocated different colors for different tags that are assigned to employees. This allows users to easily classify and identify the different tags.
-
Modified the result display to display error messages in red. This allows users to quickly identify when they make a mistake.
-
-
Code contributed: [Functional code] [Test code]
-
Other contributions:
-
Project management:
-
Managed releases
v1.2,v1.4,v1.4.1,v1.5rcandv1.5on GitHub -
Populated application with sample data for demo purposes. #227
-
-
Enhancements to existing features:
-
Documentation:
-
Community:
-
Tools:
-
Integrated a third party library (CalendarFX) to the project (#116)
-
-
Contributions to the User Guide
Given below are sections I contributed to the User Guide. They showcase my ability to write documentation targeting end-users. |
Graphical User Interface
This section will help you understand the different sections of PTMan’s Graphical User Interface(GUI).
Figure 1 below shows a typical PTMan GUI with its different sections highlighted and labelled.
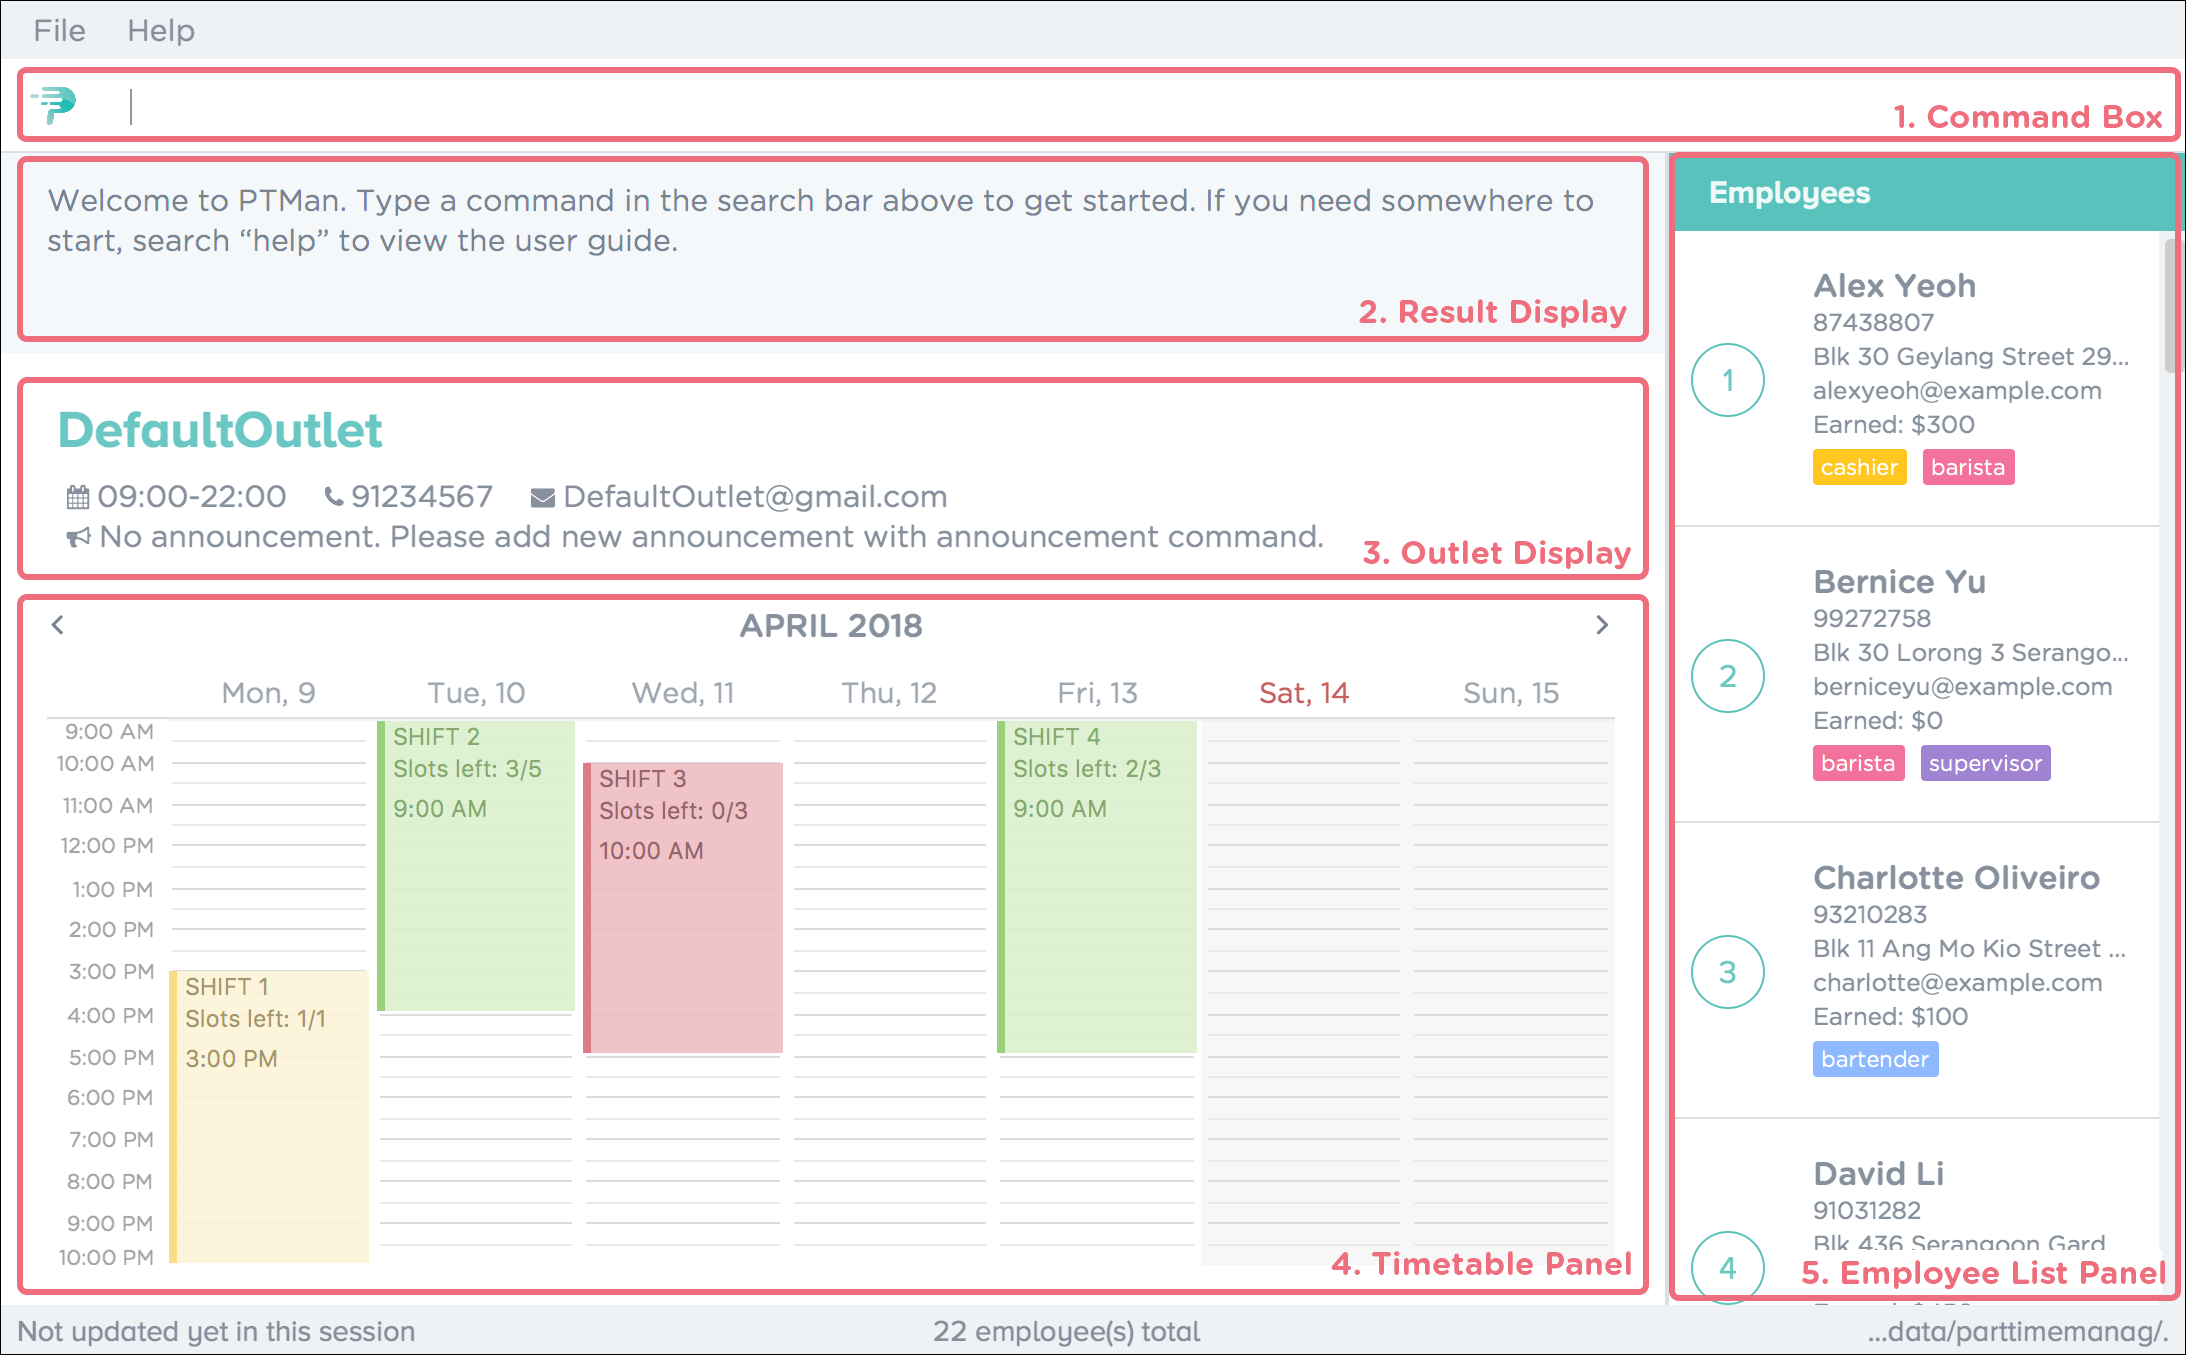
Following the labels in Figure 1, here are what the different sections are responsible for.
| Label | Name | What it is for |
|---|---|---|
1 |
Command Box |
Allows you to type in your commands into PTMan. |
2 |
Result Display |
Shows the resulting feedback from your most recent command. |
3 |
Outlet Display |
Displays all your outlet details. |
4 |
Timetable Panel |
Displays the weekly timetable containing all the shifts stored in PTMan. |
5 |
Employee List Panel |
Shows a list of all the part-time employees stored in PTMan. |
Timetable
PTMan has a timetable that displays all the shifts in a weekly format. There are many interactions between the timetable and you, as a user, so this section aims to familiarise you with the timetable.
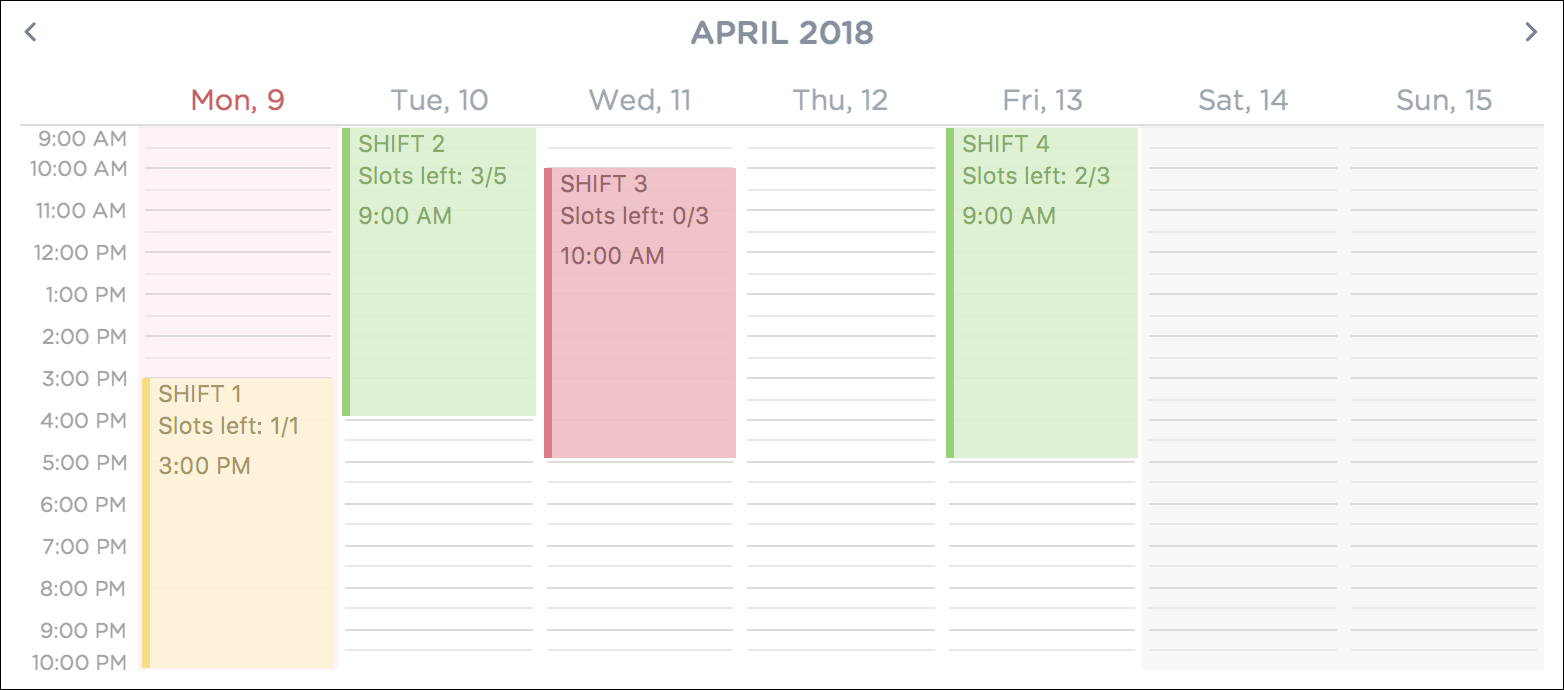
Shift colours
The shifts in PTMan are colour-coded, and here is what the different colours mean:
-
Green: Shift is available with multiple slots left.
-
Yellow: Shift is available, but slots are running out.
-
Red: Shift is no longer available, all slots for the shift have run out.
-
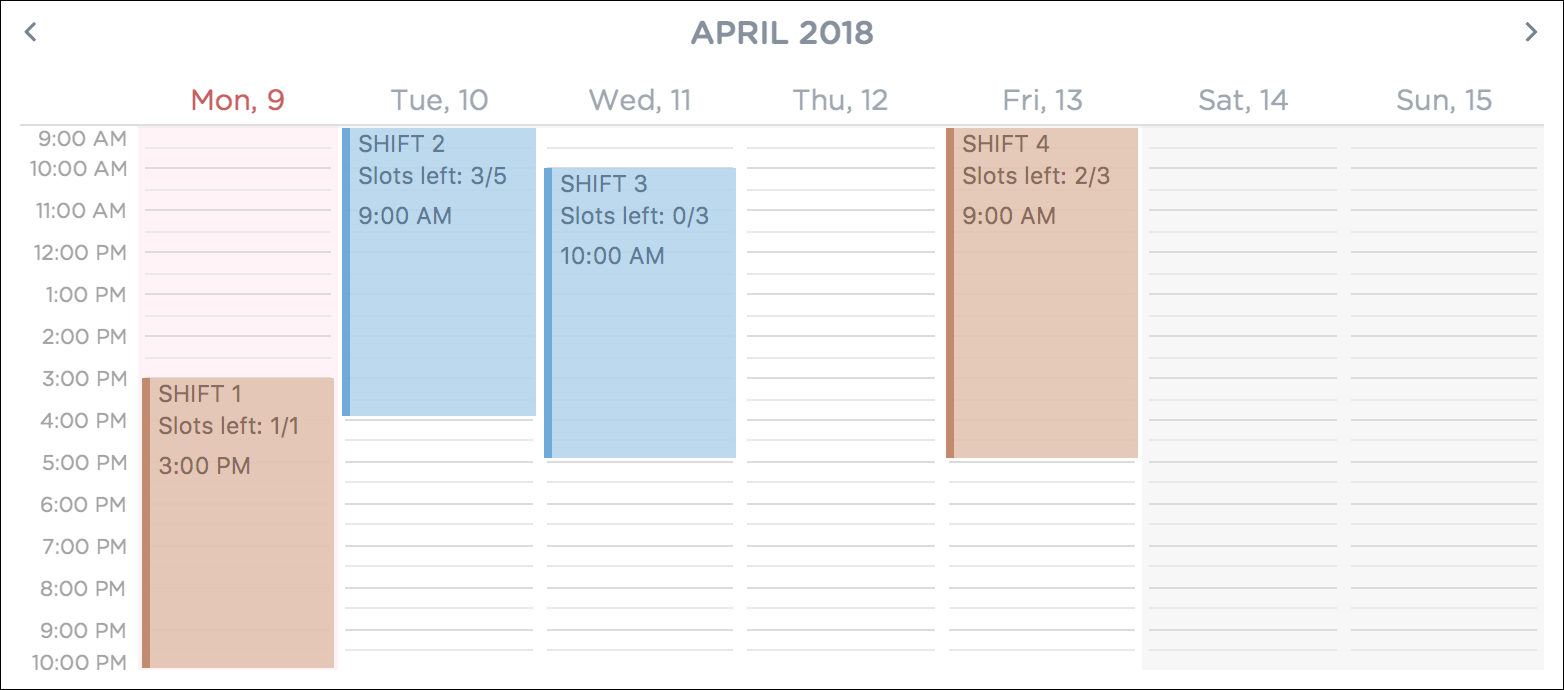
Blue: Shift is taken up by currently selected employee.
-
Brown: Shift is not taken up by currently selected employee.
Figure 2 below shows how the timetable looks like in a sample PTMan app.
PTMan also allows employees to view their own shifts using the select command.
Figure 3 shows how the timetable look like in a sample PTMan app when an employee is selected.
selectTimetable navigation
There are two ways to navigate through the different weeks in the timetable:
-
Using Keyboard Shortcuts
-
For Windows:
-
Ctrl + Shift + → : Navigates timetable to the next week.
-
Ctrl + Shift + ← : Navigates timetable to the previous week.
-
Ctrl + Shift + ↓ : Navigates timetable to the current week.
-
-
For Mac:
-
Command + Shift + → : Navigates timetable to the next week.
-
Command + Shift + ← : Navigates timetable to the previous week.
-
Command + Shift + ↓ : Navigates timetable to the current week.
-
-
-
Using Mouse Clicks
-
At the top of the timetable, there is a navigation bar with two arrow buttons which you can click on. These buttons
<and>navigates the timetable to the previous and next week respectively. Figure 4 below shows the navigation bar, with the two arrow buttons circled. Figure 4. Navigation Bar of Timetable
-
Listing all employees: viewshift
Shows a list of all employees who have applied for the specified shift index in PTMan.
Format: viewshift SHIFT_INDEX
Shorthand: vs SHIFT_INDEX
To stop displaying the employees of the specified shift, use the list command.
|
Guided Example:
-
To view all employees in the second shift, key in the following as illustrated in Figure 5.
 Figure 5. Viewing Employees in Shift 2
 -
Upon successful execution of the command, you will see a confirmation message in the result display, and the employees listed in the employee list panel as shown in Figure 6.
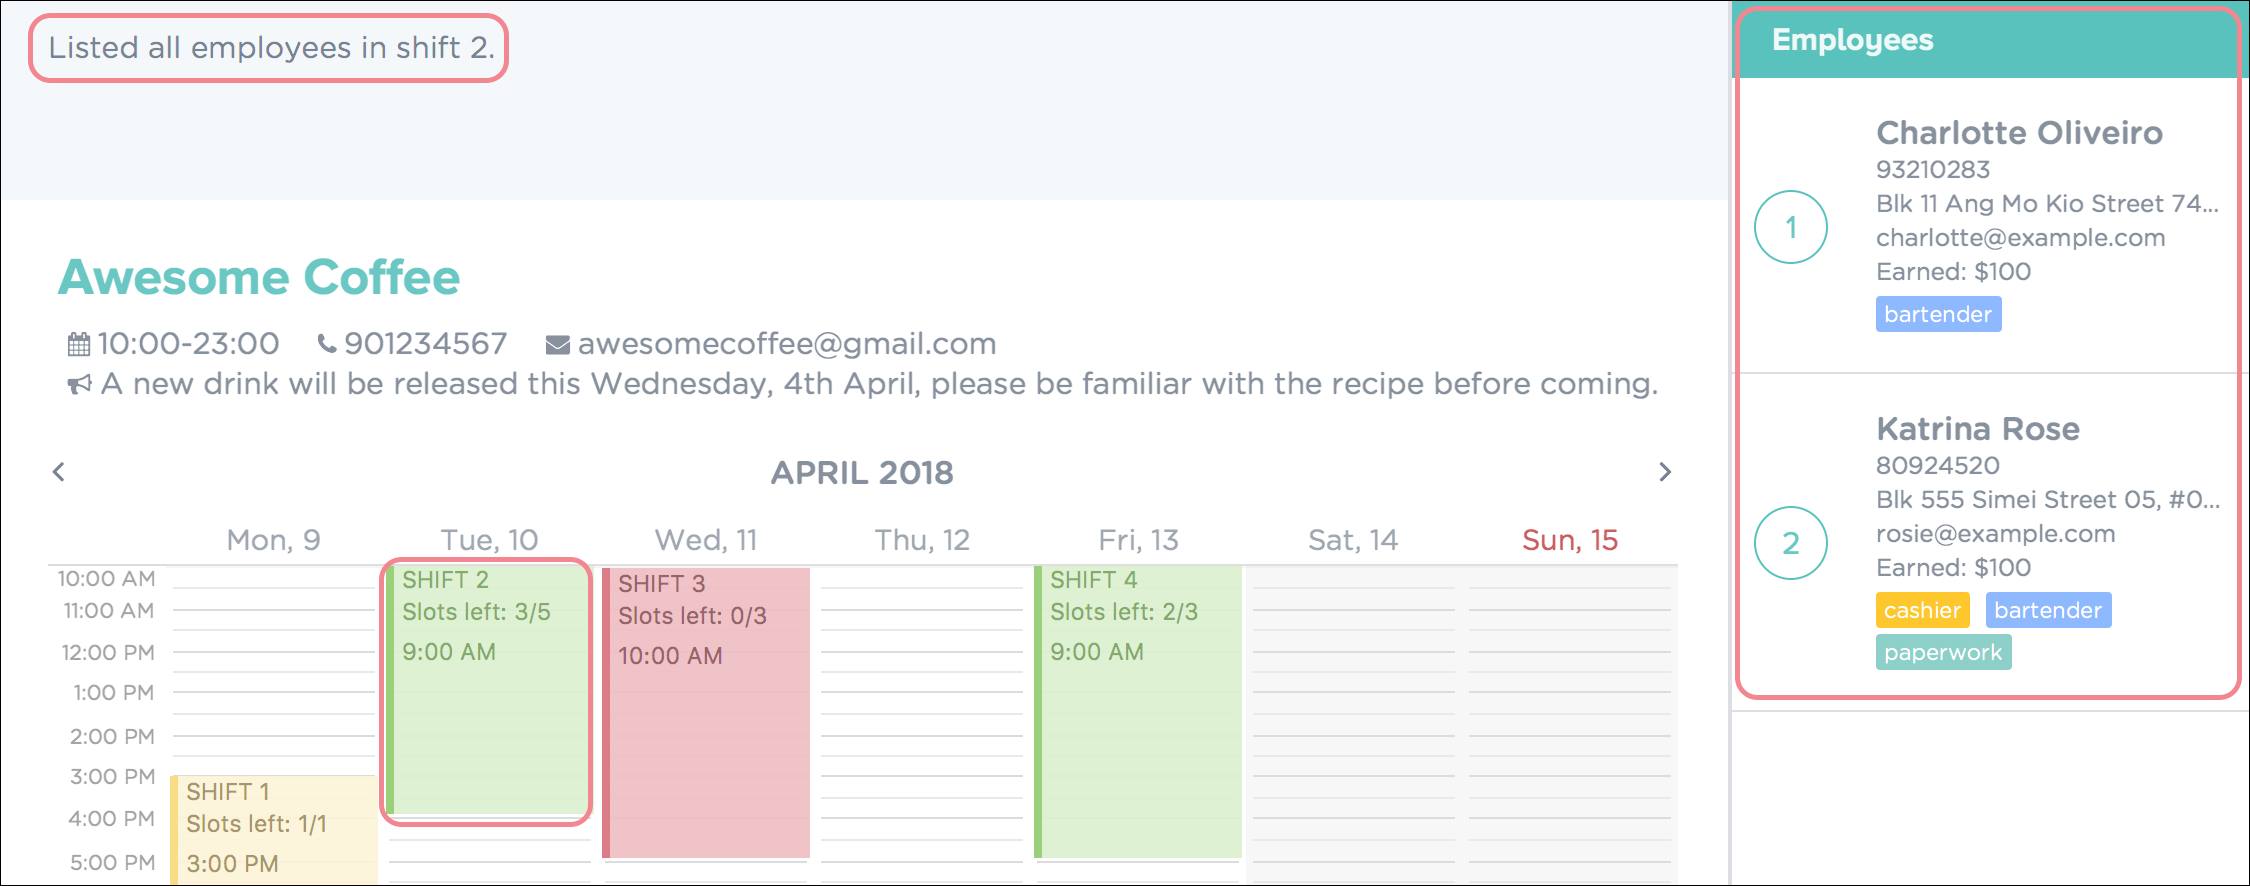 Figure 6. Successful Edit of Employee Details in PTMan
Displaying an employee’s shift on the timetable: select
Displays the shifts of the selected employee on the timetable view. Shifts applied by the selected employee would be displayed
in blue, while the other shifts would be displayed in brown.
Format: select EMPLOYEE_INDEX
Shorthand: sel EMPLOYEE_INDEX
| Alternatively, you can select an employee by clicking on the employee’s card in the employee list. |
To stop displaying the employee’s shifts on the timetable, use the deselect command. |
Guided Example:
-
To highlight shifts applied by the third employee, key in the following as illustrated in Figure 7.
 Figure 7. Selecting Employee to Highlight Applied Shifts
Figure 2 shows how the timetable looks like prior to the
selectcommand.
Figure 8. Initial Timetable Before Selection of Employee -
Upon successful execution of the command, you will see a confirmation message in the result display, and the shifts highlighted in the timetable as shown in Figure 9.
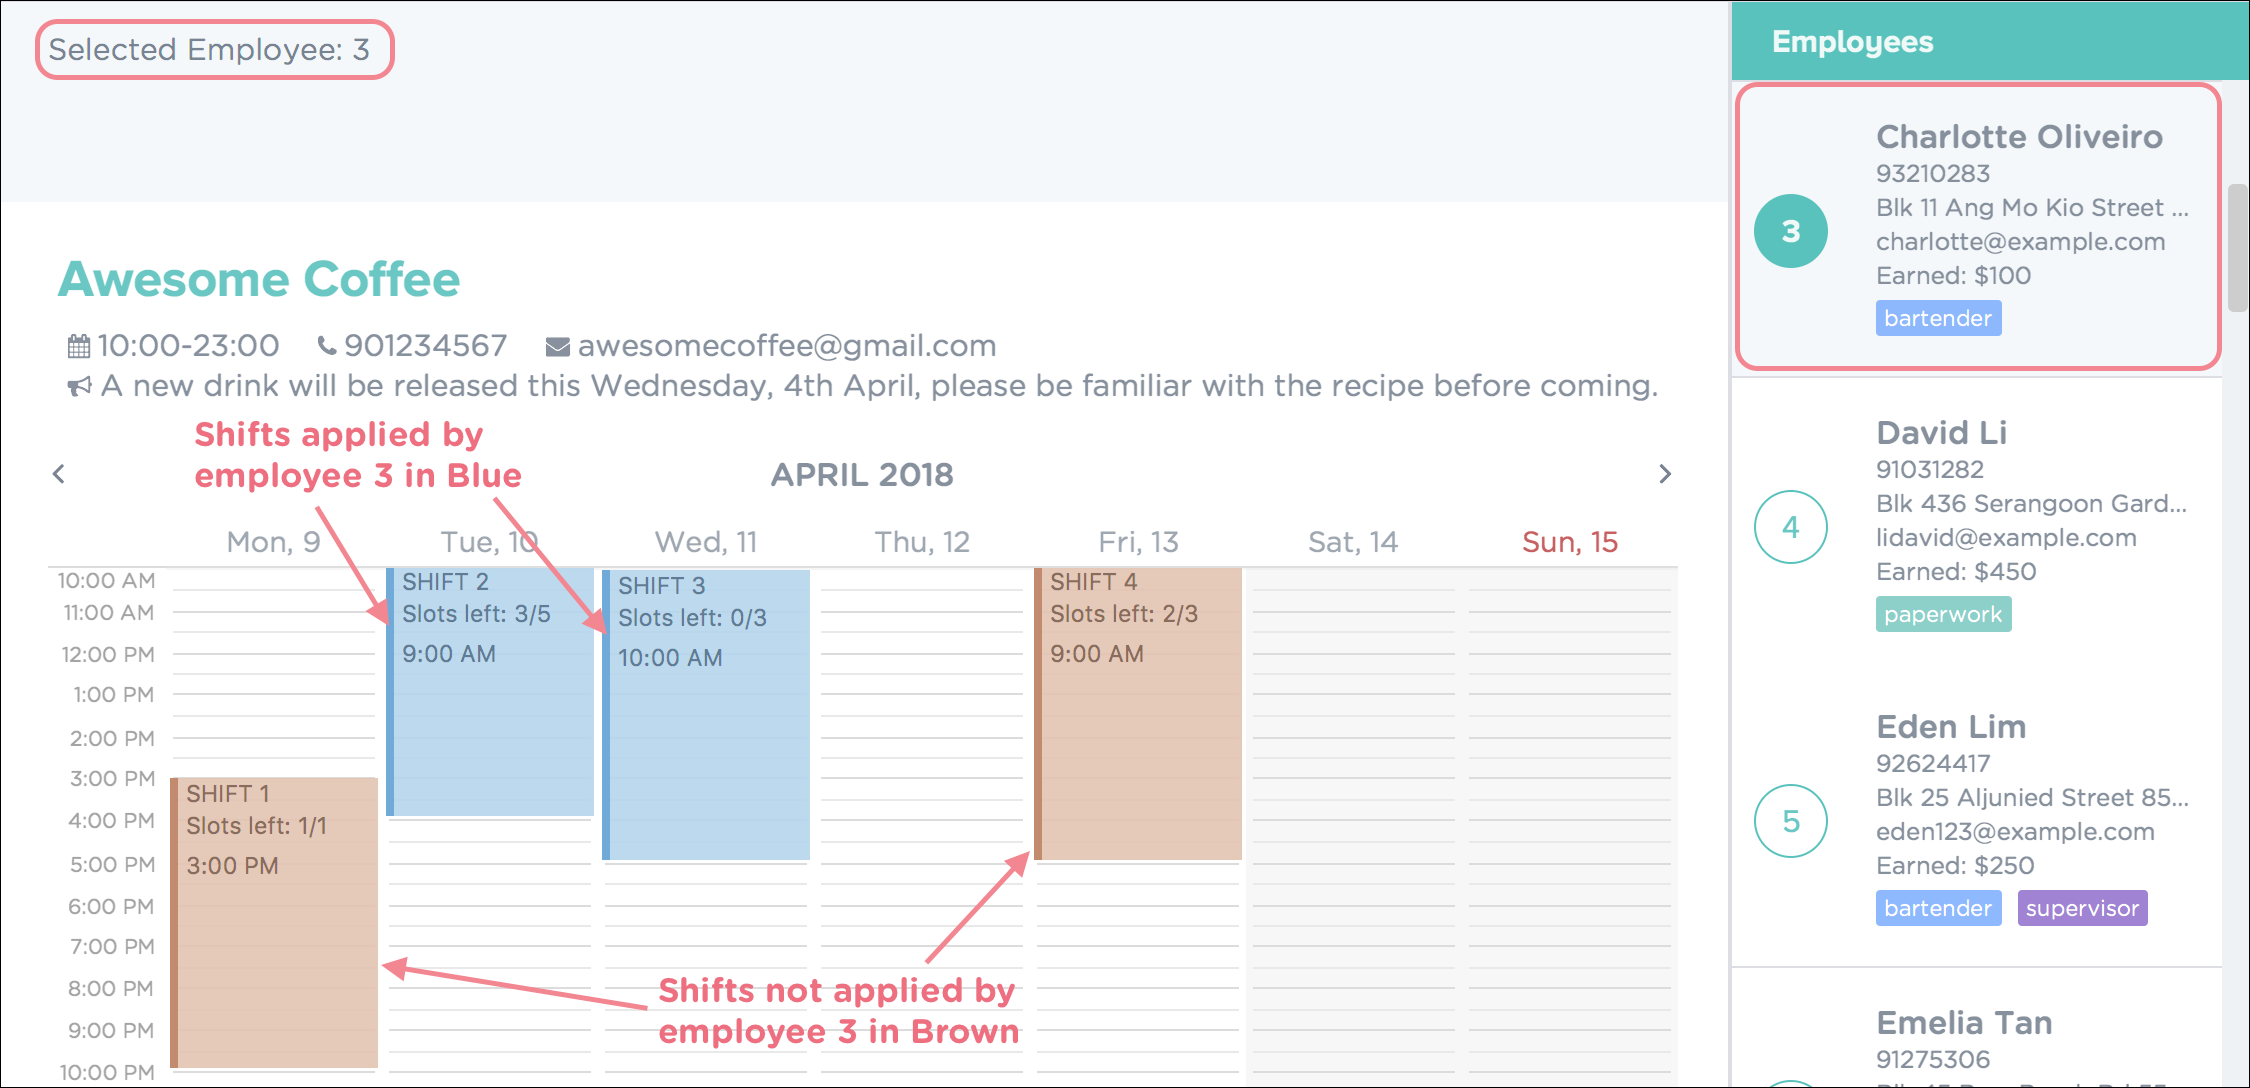 Figure 9. Successful Selection of Employee with Shifts Highlighted
More Examples:
-
To select the employee
1in the results of thefindcommand and display their shifts in the timetable, type:
find Betsy
select 1
Deselecting an employee: deselect
Displays the timetable without any employee selected.
Useful for users to navigate back to the default timetable after using the select command.
Format: deselect
Shorthand: dsel
Exporting the timetable as image: export
Exports the current timetable displayed as an image and either saves it locally into the location for your jar file,
or emails the exported timetable to the input email address.
Format: export [e/EMAIL]
Shorthand: exp [e/EMAIL]
Guided Example:
-
To export the timetable and email it to yourself, key in the following as illustrated in Figure 10.
 Figure 10. Exporting Timetable to Email
 -
Upon successful execution of the command, you will see a confirmation message in the result display as shown in Figure 11.
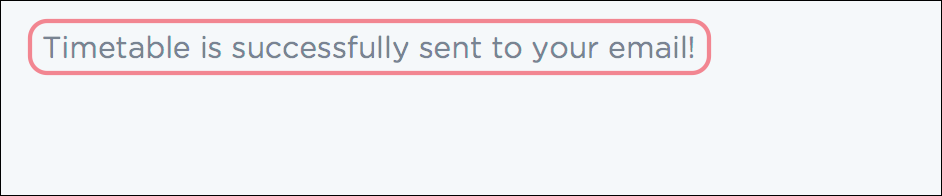 Figure 11. Successful Export of Timetable to Email
An email will also be sent to you as show in Figure 12.
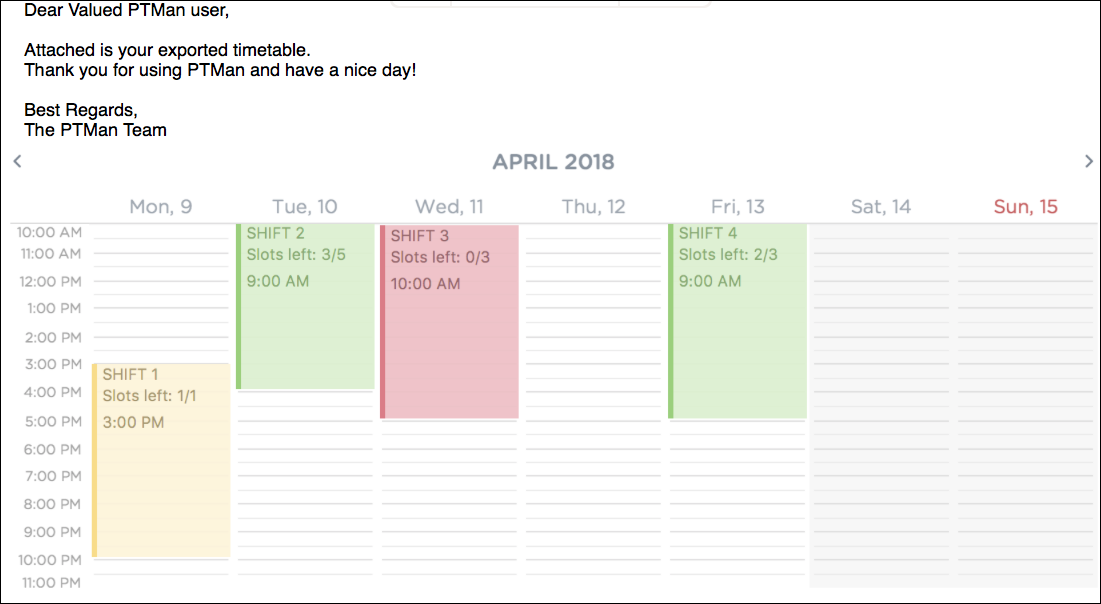 Figure 12. Successful Selection of Employee with Shifts Highlighted
More Examples:
-
To export the current timetable in PTMan, type:
export -
To export the timetable with the shifts of employee
1in PTMan, type:
select 1
export -
To export the timetable with the shifts of employee
1in PTMan and send the exported timetable as email, type:
select 1
export e/email@example.com
Contributions to the Developer Guide
Given below are sections I contributed to the Developer Guide. They showcase my ability to write technical documentation and the technical depth of my contributions to the project. |
Timetable Feature
PTMan has a timetable that increases interactivity between users and shifts. Figure 2 below shows how the timetable looks like.
Reason for implementation
A timetable is useful for both employers and employees, as it allows them to visualise the shifts and access them via their indexes. The timetable instantly reflects any changes to the shifts and allows selected employee’s shifts to be highlighted. Users are also allowed to export the timetable as image for future reference. All in all, the timetable feature improves user experience and brings convenience to the user.
How it is implemented
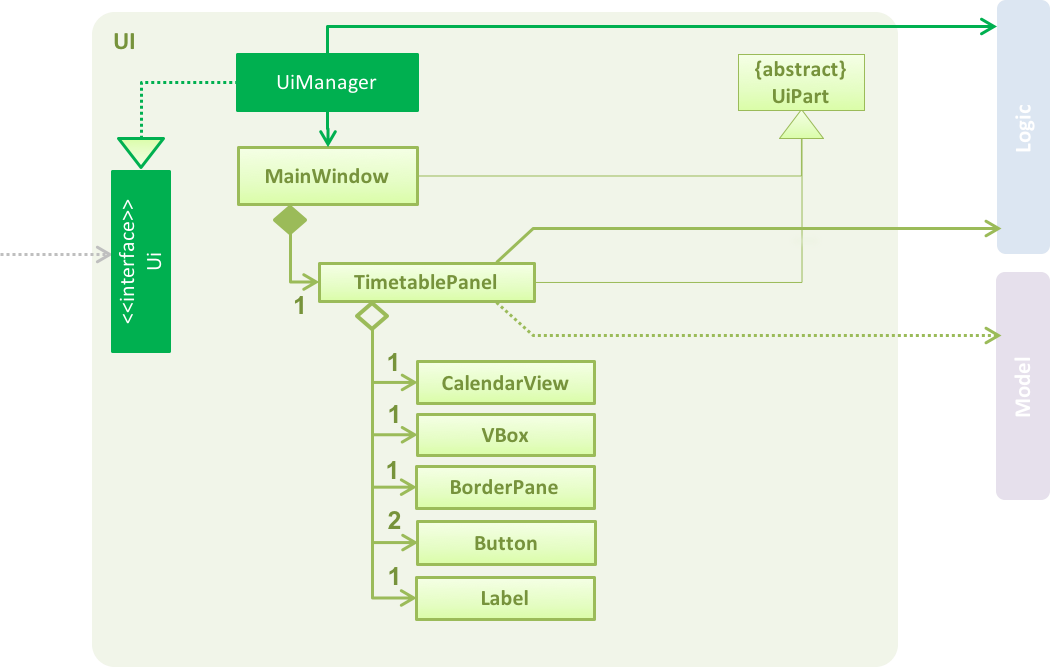
The timetable is created with the help of the CalendarFX library, and TimetablePanel
is the main class in charge of displaying the timetable.
TimetablePanel contains the following JavaFX components:
-
A
CalendarViewobject.CalendarViewis a class in CalendarFX, and it is responsible for displaying the timetable in theTimetablePanel. -
A
BorderPaneobject.BorderPaneis the object in charge of displaying the navigation bar of the timetable. -
A
Labelobject.Labelis the object in charge of displaying the text (in this case, the month and year) in the navigation bar. -
Two
Buttonobjects. Each of theButtonobject is in charge of displaying the left/right buttons in the navigation bar. It allows users to click on them to navigate through the weeks in the timetable. -
A
VBoxobject.VBoxis in charge of layingBorderPaneandCalendarViewout in a vertical column.
Figure 14 below shows a class diagram of the TimetablePanel and its association with JavaFX components.
A TimetablePanel is created with its constructor:
public TimetablePanel(Logic logic) {
    // ...
    this.logic = logic;
    this.shiftObservableList = logic.getFilteredShiftList();
    this.outletInformation = logic.getOutletInformation();
    // ...
}
Using the logic argument, the TimetablePanel constructor initialises shiftObservableList and outletInformation.
These pieces of information are important to the TimetablePanel because:
-
shiftObservableListis anObservableList<Shift>object, and is responsible for providingTimetablePanelwith the shifts required to build the timetable. Shifts are added to the timetable in the methodsetShifts(). -
outletInformationis anOutletInformationobject, and is responsible for providingTimetablePanelwith the operating hours of the outlet. The timetable re-scales according to the operating hours of the outlet, in the methodsetTimetableRange().
Updating the timetable
The main method in charge of updating the timetable is updateTimetableView().
When this method is called, the Label in the navigation bar is set to show the month that is being displayed
on the timetable, and the timetable is rebuilt with the newly set shifts and operating hours.
updateTimetableView() is called whenever a PartTimeManagerChangedEvent, TimetableWeekChangeRequestEvent or EmployeePanelSelectionChangedEvent is posted.
We will use PartTimeManagerChangedEvent to illustrate updateTimetableView() works.
Figure 15 below shows a high level sequence diagram of what happens when a PartTimeManagerChangedEvent
is posted and how it causes the UI to call updateTimetableView().
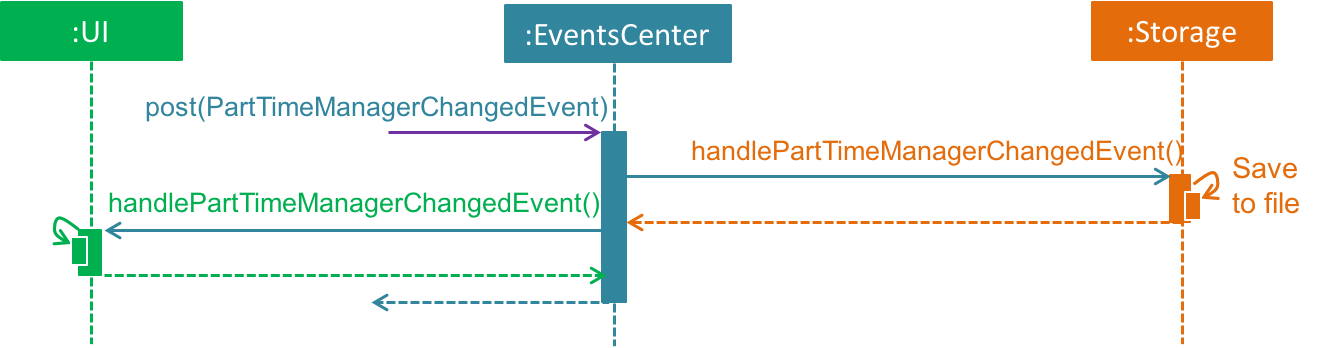
PartTimeManagerChangedEventFigure 16 below shows the sequence diagram of how TimetablePanel carries out updateTimetableView() to
respond to a PartTimeManagerChangedEvent.
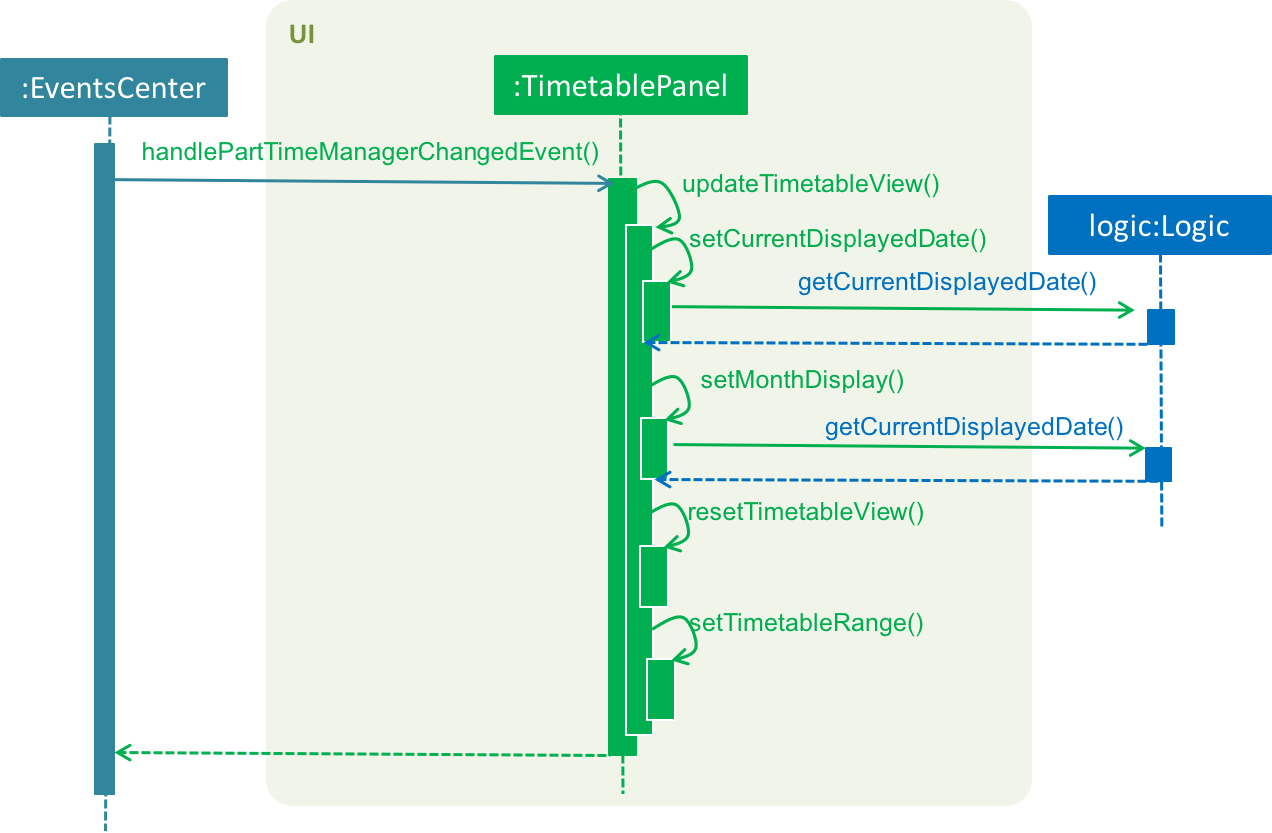
Here are some examples of when updateTimetableView() is called:
-
A
Shiftis added, removed, or altered:PartTimeManagerChangedEventis posted which is handled by callingupdateTimetableView()to rebuild the timetable with the changed shifts. -
OutletInformationis edited:OutletInformationChangedEventis posted which is handled by callingupdateTimetableView()to rebuild the timetable and fit in the updated operating hours. -
The user wants to navigate the timetable to the next/previous/current week:
TimetableWeekChangeRequestEventis posted which is handled by callingnavigateToNextWeek(),navigateToPreviousWeek()ornavigateToCurrWeek()accordingly. All of these methods callupdateTimetableView()to rebuild the timetable displaying the appropriate weeks. -
Selection/Deselection of an employee:
EmployeePanelSelectionChangedEventis posted which is handled by callingloadEmployeeTimetable(employee)orloadDefaultTimetable()accordingly. Both of these methods callupdateTimetableView()to rebuild the timetable with the appropriate colours of the entries.
Commands
The following are commands that are supported as part of the timetable feature:
-
SelectCommand: Selects an employee and highlight their shifts on the timetable. -
DeselectCommand: Returns the timetable back to the default view of the current week. -
ExportCommand: Exports timetable as an image.
Viewing of individual employee’s shifts
PTMan allows employees to highlight their own shifts on the timetable through SelectCommand. When a particular employee is
being selected, EmployeePanelSelectionChangedEvent is posted with the selected employee as its argument.
EmployeePanelSelectionChangedEvent has the following constructor:
public EmployeePanelSelectionChangedEvent(EmployeeCard newSelection)
TimetablePanel subscribes to this event and handles it by calling the loadEmployeeTimetable method for the newSelection.
Returning to default view of timetable
The DeselectCommand deselects any selected employee and returns the timetable back to its default style.
EmployeePanelSelectionChangedEvent is posted with null as its argument.
TimetablePanel subscribes to this event and handles it by calling the loadDefaultTimetable method.
Exporting timetable
Exporting of the timetable is triggered by ExportCommand, which:
-
Saves the timetable as an image locally if no email address is specified, or
-
Sends the timetable as an image through email if an email address is specified.
The former posts an ExportTimetableAsImageRequestEvent, while the latter posts an ExportTimetableAsImageAndEmailRequestEvent,
both of which are subscribed to by TimetablePanel.
TimetablePanel handles them by calling exportTimetableAsImage or exportTimetableAsImageAndEmail accordingly.
The exporting works by taking a Snapshot of the timetableView node, and then writing it into a local file.
If exportTimetableAsImageAndEmail is called instead of exportTimetableAsImage, this image
will be emailed through the EmailService class, and then deleted from local storage.